

Video Guides at YouTube
Meta Snapshot Summary
18.2b nerfed Fast 9, but Fast 9 is still the best comp.
Augment Guide, Opener Guide
Check out the 100 Tips I have to get started in Set 18
Dive deep into TFT Data, Stats, and Match History
Check out the Patch Review!
Be on the lookout by bookmarking this page or subscribing to my YouTube for the latest news and comps.
Check Leveling Guide so you know what to do for each comp (includes reroll and Augments)
* NEW PLAYERS CLICK HERE *
* TFT Dictionary *
* Common TFT Mistakes *
How to Learn TFT
Basics of TFT
Fundamentals of TFT
* How to Actually get to Challenger *
Best TFT Builds & Team Comps for Set 18 Patch 18.2b Meta
S: Ashe Fast 9,
A: Dragon Fast 9, Draven Fast 9, Aphelios Flex, Primal Malphite, Invoker Ahri Morgana, Flora Malphite, Solar Yunara,
B: Solar Akali, Caitlyn Reroll, Veigar Reroll, Defender Cassiopeia, Blossom Ahri, Tristana Rengar Reroll, Invoker Nidalee, Solar Kayle, Adaptor Master Yi Reroll,
C: Riftbeast Reroll,
Special: Unrivaled
Comps to 1 Trick: Aphelios Flex, Primal Malphite, Flora Malphite, Invoker Ahri Morgana,
Exodia Comps: Dragon Fast 9, Ashe Fast 9, Draven Fast 9,
Beginner Comps (Below Diamond):
* = has a big requirement such as an emblem or specific augment
Special Tier = Requires a specific setup to work (Note that “Not Special” doesn’t mean never click, it just means it’s worse than the other special tiers)
Note that Items don’t really matter that much, so don’t grief your game to get specific items unless I mention a specific item is required.
Try out different types of positioning and champions in these TFT builds too! There is a ton of variation in TFT so be sure to check out the Core units in the tierlist and then flex the rest of your team!
Want more Tier Lists?
You can also DM and message me there about anything.
TFT Comps Tier List Set 18
S Tier: Best TFT Comps – Highly Flexible or Very Strong
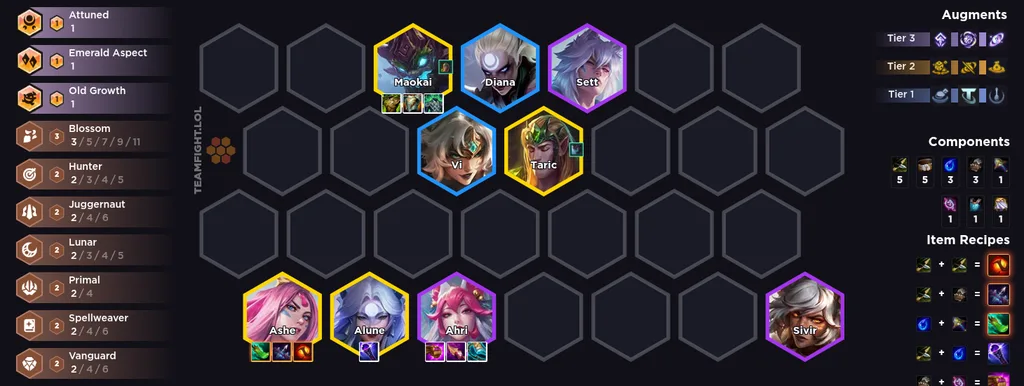
Ashe Fast 9
Copy Team Code
Copy Team Code
Leveling Pattern:
Fast 8/9
Win Streak
| Round | 2-1 | 2-5 | 3-1 | 3-5 | 4-2 | 5-2 |
| Level | 4 | 5 | 6 | 7 | 8 | 9 |
Lose Streak
| Round | 2-3 | 2-7 | 3-2 | 3-5 (40g+) | 4-1 | 5-5 |
| Level | 4 | 5 | 6 | 7 | 8 | 9 |
Mixed Streak
| Round | 2-1 or 2-3 | 2-5 or 3-1 | 3-2 | 3-5 or 4-1 | 4-2 | 5-5 or 6-1 |
| Level | 4 | 5 | 6 | 7 | 8 | 9 |
Conditions:
- Ability to go 9 by 5-2
- Lots of econ
- Lots of items or TGs to itemize 5 costs
- Shojin Ashe
How to Play: Explorer
- Gameplan: This is the easiest variant of Fast 9 to pivot into as it can play from an Invoker Morg + Ahri set up, anormal Blossom set up or a Sivir set up. There are a lot of boards that can lead into this comp as the only hard requirement is a Shojin on Ashe and the ability to go level 9.
- Stage 1-2: Play your strongest opener around Blossom ideally to farm upgraded wisps. If you are not win streaking look to pivot to a level 8 Ahri variant.
- Stage 3: Continue your win streak and ideally take an item augment on 3-2 to remain strong and help meet the hefty item requirements of this comp.
- Stage 4: If you reach stage 4 with 80+ HP, look to take an econ augment on 4-2 and sac the stage. Aim to go 9 on 5-1.
- Stage 5+: Transition your board to the one above and roll for a wisp every turn. Level 10 is often a bait if you have not 2 starred your entire board or are insanely rich.
- Tips:
- Take the Healing primal buff almost always. If you pivoted in from a Sivir set up items or execute can be ok as well.
- This comp can be pivoted into from most Ahri or Sivir variants. Ashe can be used to cap out both of those comps.
- Taric and Gnar are replaceable with one another. If you are main tanking Sett, play 2 Brawler.
- Maokai can take a while to scale, do not itemize Maokai 1.
- Ashe’s spell covers a lot of the board and ticks enemies down over time, this makes Last Whisper and Red Buff very efficient on her. Her spell can be thought of like Morgana’s where utility is BIS due to all the uptime.
- Ashe wants to be opposite side of enemy as she shoots her arrow towards the largest line of enemies.
- 7 Blossom during stage 4 can be a great condition to play this comp from as you will be rich enough to get to max cap.
- 6 Juggernaut is a way to get to 9 and cap out. If you are very rich you can drop to 4 Juggernauts + Legendaries.
Item Holder: Cinderling, Karma
Items:
- Ashe: Shojin/Blue, Red Buff, Last Whisper
- Morello, IE
- Ahri: Jeweled Gauntlet, Striker’s, Nashors/Shojin/Blue
- Maokai/Sett: Generic Tank
- Alune: Utility, Leftover AP
Augments:
- BIS: Econ
- General: Econ > Item > Combat
Learn TFT the right way
A Tier: Solid TFT Team Comps. Weaker, less flexible, requires more luck than S-Tier
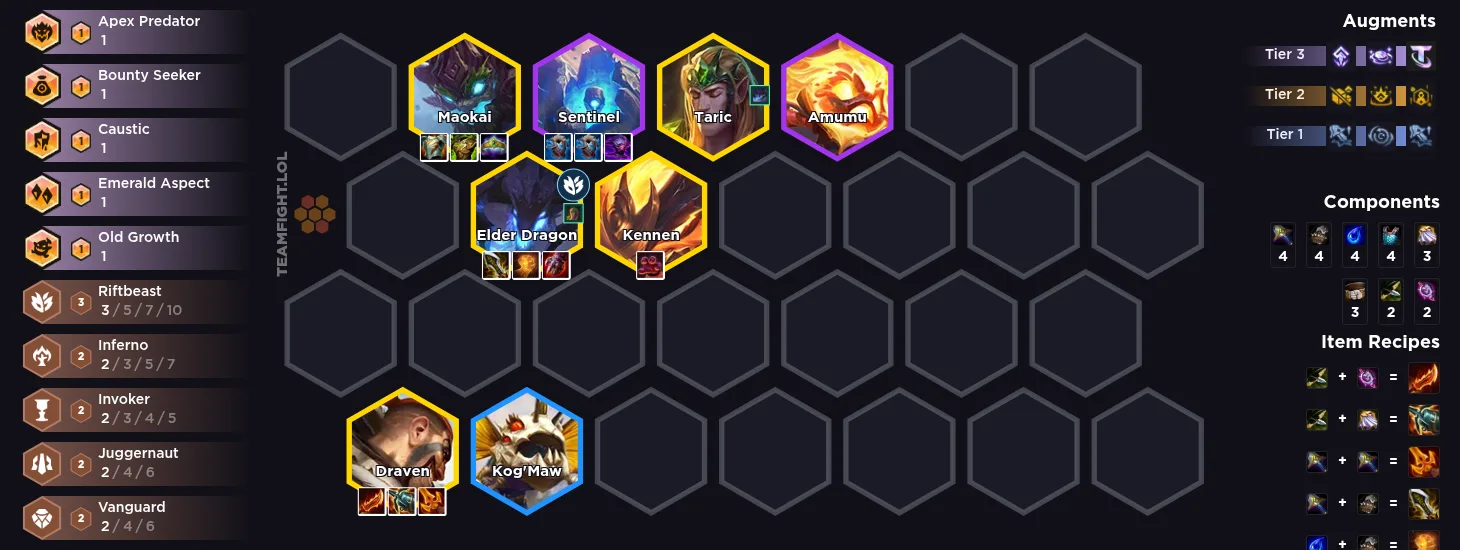
Dragon Fast 9
Copy Team Code
Leveling Pattern:
Fast 8/9
Win Streak
| Round | 2-1 | 2-5 | 3-1 | 3-5 | 4-2 | 5-2 |
| Level | 4 | 5 | 6 | 7 | 8 | 9 |
Lose Streak
| Round | 2-3 | 2-7 | 3-2 | 3-5 (40g+) | 4-1 | 5-5 |
| Level | 4 | 5 | 6 | 7 | 8 | 9 |
Mixed Streak
| Round | 2-1 or 2-3 | 2-5 or 3-1 | 3-2 | 3-5 or 4-1 | 4-2 | 5-5 or 6-1 |
| Level | 4 | 5 | 6 | 7 | 8 | 9 |
Conditions:
- Ability to go 9 by 5-2
- Lots of econ
- Lots of items or TGs to itemize 5 costs
How to Play: Explorer
- Gameplan: This comp is feast or famine. You must go level 9 to be successful, if you find yourself rolling on 8 very much at all you likely already bot 4’d. Elder 1 is weak and loses most fights but Elder 2 can be game winning so this comp can be risky if your spot can’t consistently go level 9. Draven is the highest cap duo carry but not the only option.
- Stage 1-2: Play your strongest opener while slamming AD items for either Draven or Elder. Do not commit to this line if you are unsure in your ability to go 9.
- Stage 3: Continue your streak and look to pivot if you get snapped. Sivir, Nidalee and Aphelios hold most AD slams and are great pivot options.
- Stage 4: Most of the time you will sac stage 4 and look to level on 5-1/5-2. If you are dying consider leveling on 4-5 if you are rich.
- Stage 5+: Level to 9 and roll for your board. Don’t upgrade luxury legendaries you don’t have items for until you have Dragon 2, Draven 2, and Maokai 2 or Taric 2.
- Tips:
- The frontline is flexible, the only static units are the 5 cost you are carrying which are close to traitless. Consider 2 Unit combos like Sett + Krug, Amumu or Maokai + Scuttle Crab and Sentinel + Taric instead of defaulting a certain front line.
- Kog’Maw’s Caustic trait provides Shred and Sunder so do not build these items if you intend on playing him.
- Krug, Scuttle Crab and Sentinel can all be considered as the 3rd Riftbeast as they all provide great teamwide Alpha Mark buffs.
- If you are playing Draven, you must have a Guinsoo’s.
- Maokai scales with game length so the earlier you can roll down the better. Aim for 5-1 as a baseline, 5-2 at the latest.
- Takedowns and Kills are 2 very different things for Draven’s Bounty Seeker cash outs. Takedown means Draven participated in the kill while Kill means last hit. Make sure your Draven is strong enough to last hit consistently if you take a Kill quest as you might accidentally lock yourself out of Bounty Seeker Rewards.
- Elder’s auto attacks cleave adjacent units dealing 75% of the original damage, make sure to position him between enemy front liners to get max value out of this.
- This comp is even more feast or famine than Draven Fast 9 as we don’t have a low cost shell to stabilize around. Draven Fast 9 can play to save HP around Elderwoods and can pivot in that direction if need be. This comp lives or dies by being able to find multiple 5 cost 2 stars. This means higher potential cap, more risk.
Item Holder: Cinderling, Camille, Xayah
Items:
- Elder Dragon: IE, Hand of Justice, Sterak’s
- Deathblade, Striker’s
- Draven: Guinsoo’s, Kraken, Deathblade
- Last Whisper, Giant Slayer, IE
- Maokai: Generic Tank
- Sentinel: Vow, Adaptive Helm
Augments:
- BIS: Level Up
- General: Econ > Items > Combat
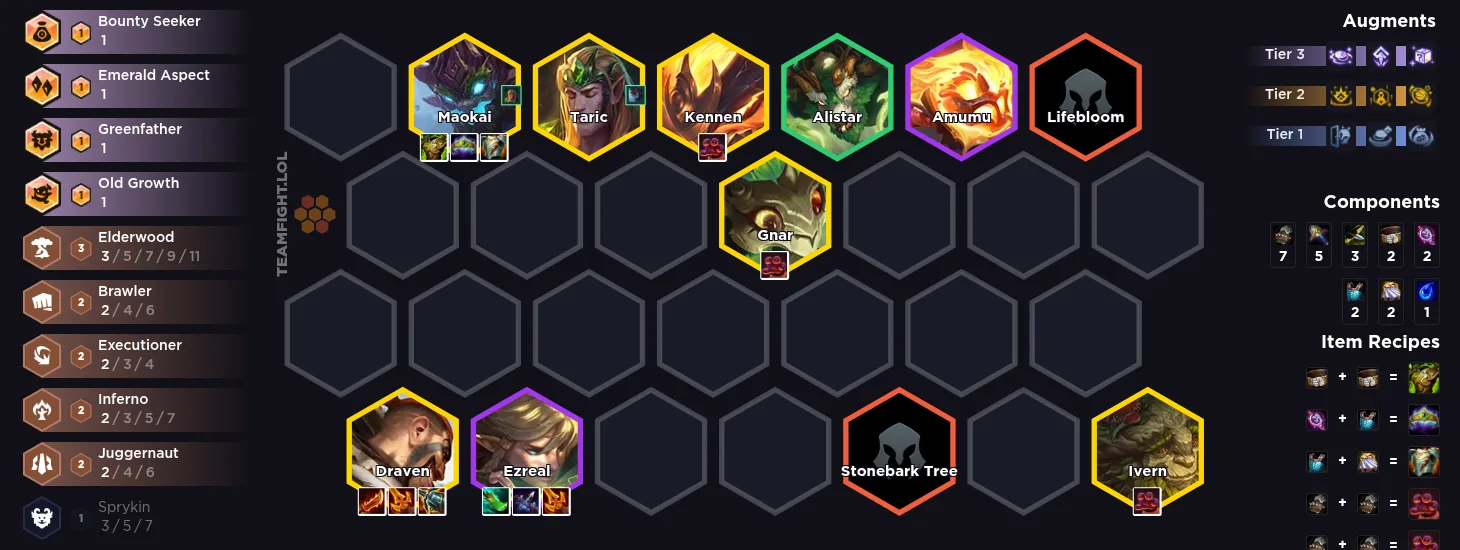
Draven Fast 9
Copy Team Code
Leveling Pattern:
Fast 8/9
Win Streak
| Round | 2-1 | 2-5 | 3-1 | 3-5 | 4-2 | 5-2 |
| Level | 4 | 5 | 6 | 7 | 8 | 9 |
Lose Streak
| Round | 2-3 | 2-7 | 3-2 | 3-5 (40g+) | 4-1 | 5-5 |
| Level | 4 | 5 | 6 | 7 | 8 | 9 |
Mixed Streak
| Round | 2-1 or 2-3 | 2-5 or 3-1 | 3-2 | 3-5 or 4-1 | 4-2 | 5-5 or 6-1 |
| Level | 4 | 5 | 6 | 7 | 8 | 9 |
Conditions:
- Guinsoo’s Draven
- Ability to go 9 by 5-2
- Lots of econ
- Lots of items or TGs to itemize 5 costs
How to Play: Explorer
- Gameplan: This comp must go level 9 to be successful, if you find yourself rolling on 8 very much at all you likely already bot 4’d. Draven needs Guinsoo’s, its the one needed item. If you can’t reach 2 star 5 costs, you will die, making this a risky comp.
- Stage 1-2: Play your strongest opener around ideally a Guinsoo’s slam. If you are loss streaking in stage 2, look for a different line to play.
- Stage 3: Continue to be strong. If you get your win streak snapped or don’t have enough money, look to pivot to something like Aphelios Flex.
- Stage 4: Most of the time you will sac stage 4 and look to level on 5-1/5-2. If you are dying consider leveling on 4-5 if you are rich.
- Stage 5+: Level to 9 and roll for your board. Don’t upgrade luxury legendaries you don’t have items for until you have Draven 2 and Maokai 2 or Taric 2.
- Tips:
- Generally Pair Taric and Maokai, but if your backline is dying to AoE like Ahri or Morgana, consider pairing to Draven.
- Itemized Kennen can be considered if you are losing the front to back and need to kill enemy backlines.
- Draven is a traitless ramping carry, playing this unit without a Guinsoo’s is a recipe for disaster.
- Takedowns and Kills are 2 very different things for Draven’s Bounty Seeker cash outs. Takedown means Draven participated in the kill while Kill means last hit. Make sure your Draven is strong enough to last hit consistently if you take a Kill quest as you might accidentally lock yourself out of Bounty Seeker Rewards.
- Maokai scales with game length so the earlier you can roll down the better. Aim for 5-1 as a baseline, 5-2 at the latest.
- Gnar and Kennen can hold almost any leftover AD or AP item respectively so don’t be afraid to slam and build towards either of these units.
- Ivern is a flex slot but an early Ivern can be a game winning.
- Almost every item is usable in this line but prio Draven > Maokai > TGs.
- Generally Pair Taric and Maokai, but if your backline is dying to AoE like Ahri or Morgana, consider pairing to Draven.
Item Holder: Xayah, Cinderling, Camille, Akali
Items:
- Draven: Guinsoo’s, Kraken, Deathblade
- Last Whisper, Giant Slayer, IE
- Maokai: Generic Tank
- Ezreal: Utility, Leftover AD
- Kennen: TG, Leftover AP
- Gnar: TG, Leftover AD
Augments:
- BIS: Level Up, Birthday Present
- General: Econ > Items > Combat
Aphelios Flex
Copy Team Code
Copy Team Code
Copy Team Code
Leveling Pattern:
Fast 8/9
Win Streak
| Round | 2-1 | 2-5 | 3-1 | 3-5 | 4-2 | 5-2 |
| Level | 4 | 5 | 6 | 7 | 8 | 9 |
Lose Streak
| Round | 2-3 | 2-7 | 3-2 | 3-5 (40g+) | 4-1 | 5-5 |
| Level | 4 | 5 | 6 | 7 | 8 | 9 |
Mixed Streak
| Round | 2-1 or 2-3 | 2-5 or 3-1 | 3-2 | 3-5 or 4-1 | 4-2 | 5-5 or 6-1 |
| Level | 4 | 5 | 6 | 7 | 8 | 9 |
Conditions:
- High Tempo
- Lots of Swords
How to Play: Explorer
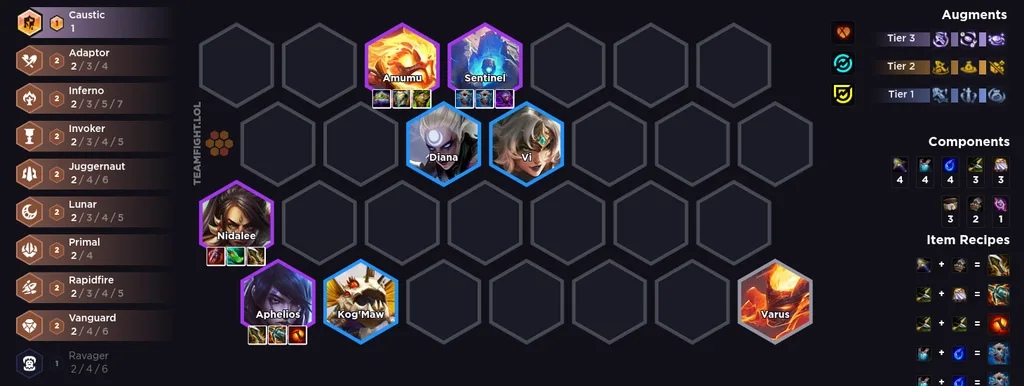
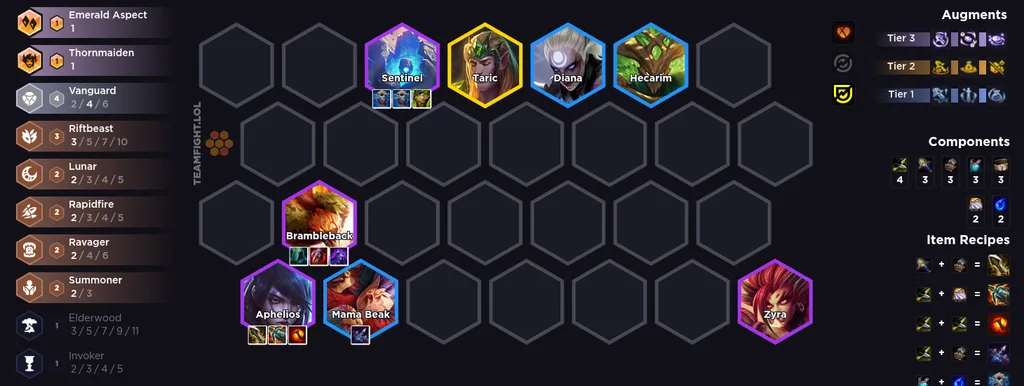
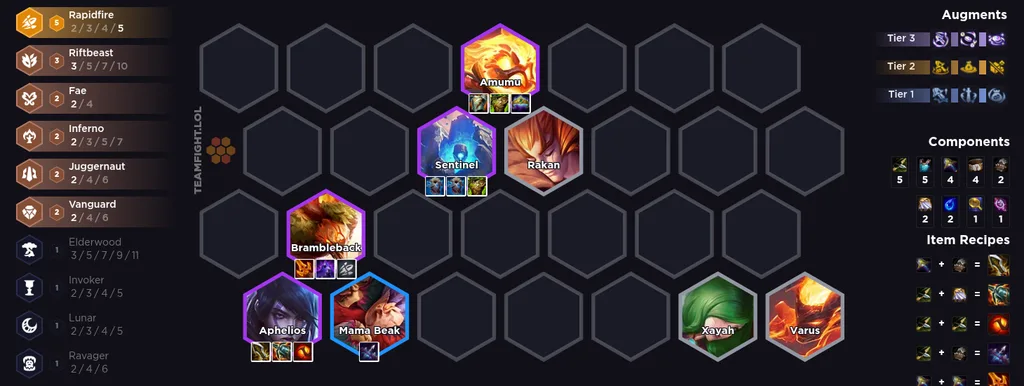
- Gameplan: Aphelios is the gameplan when you have a good AD opener but can’t quite bridge the gap to level 9 and play for Draven. He is a great AD default and uses most items decently. Nidalee is the best duo carry but Brambleback can work, specially if you have a Rapidfire Emblem.
- Stage 1-2: Play a strong opener around any AD or Attack Speed slam. Guinsoo’s isn’t BIS but it is strong early game and more than serviceable.
- Stage 3: Continue to be strong around an AD holder with Aphelios or Nidalee items. If you are heavily loss streaking prepare to roll down on 4-1 to try to hit Sentinel and Nidalee before the rest of the lobby.
- Stage 4: Roll down for Aphelios, Sentinel and Nidalee. Flex the front line if the lobby is heavily contesting Sentinel. Nidalee can stabilize bad spots extremely well so prioritize her itemization if you are playing from low HP.
- Stage 5+: Don’t level to 9 until you’ve 2 starred Aphelios and Brambleback. Go 9 for Alune or a Lux.
- Tips:
- If you fully miss on Sentinel, Amumu + Juggernauts can hold the front line down. The goal is to have enough stall to protect Nidalee as she resets.
- Guinsoo’s on Aphelios is not BIS, Red Buff is. However, Guinsoo’s is more than acceptable and should be slammed for tempo in stage 2. His itemization is very flexible as long as he has
- The Nidalee variant has the added advantage of not needing sunder due to Kog’Maw’s passive.
- Nidalee has a lot of scam potential if you position her towards the enemy weakside. If you can get both Aphelios and Nidalee on a weak front liner on stage 4 you can win fights for free.
- Nidalee and Brambleback are both very dependent on their core items. Nidalee needs Shojin while Brambleback needs at least 2 defensive items.
- If you have Rapidfire Emblem play 5 Rapidfire instead with the emblem on Brambleback. Position on weakside to get as many resets on Brambleback as possible.
- Amumu takes pure tank items, Sentinel likes mana tank items like Vow.
Item Holder: Cinderling, Xayah, Camille
Best Emblem/Spatula Holder: Rapidfire Brambleback
Items:
- Aphelios: IE, Red Buff, Kraken
- Guinsoo’s, Deathblade, Last Whisper, Giant Slayer
- Nidalee: Shojin, IE, Sterak’s
- Deathblade, Hand of Justice
- Brambleback: Sterak’s, Edge of Night, QSS
- 2/3 required, ideally all 3
- Sentinel: Vow, Adaptive Helm, Warmogs
- Amumu: Crownguard, Gargoyle’s, Warmogs
Augments:
- BIS: Sword Overflow, Swordsmith, Carve a Path, Bronze 4 Life
- General: Item > Trait > Econ > Combat
Primal Malphite
Copy Team Code
Leveling Pattern:
Fast 8/9
Win Streak
| Round | 2-1 | 2-5 | 3-1 | 3-5 | 4-2 | 5-2 |
| Level | 4 | 5 | 6 | 7 | 8 | 9 |
Lose Streak
| Round | 2-3 | 2-7 | 3-2 | 3-5 (40g+) | 4-1 | 5-5 |
| Level | 4 | 5 | 6 | 7 | 8 | 9 |
Mixed Streak
| Round | 2-1 or 2-3 | 2-5 or 3-1 | 3-2 | 3-5 or 4-1 | 4-2 | 5-5 or 6-1 |
| Level | 4 | 5 | 6 | 7 | 8 | 9 |
Conditions:
- 2 Sets of AD items
- High quality tank items for Malphite
How to Play: Explorer
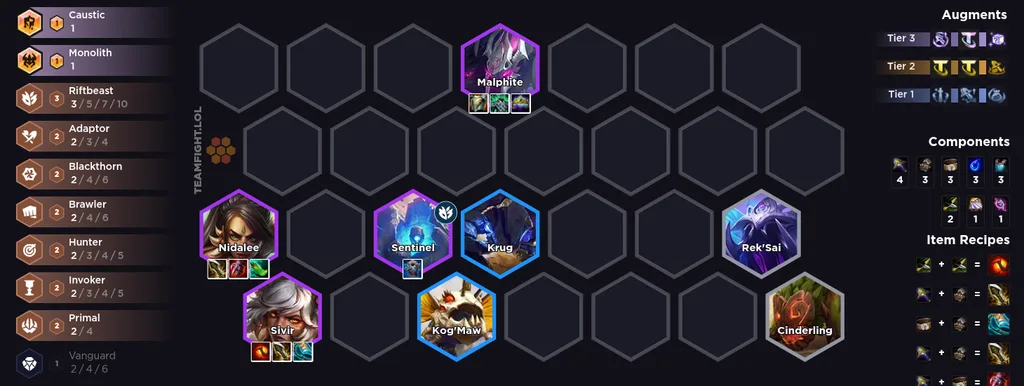
- Gameplan: This comp is an expensive level 8 comp that contests Malphite and Sentinel, which are very popular at the moment. Look to be rich on 4-2 and find these units before other players. This comp is often ok with being stuck on 8 and buying wisps every turn due to the high cost of 2 starring this board. This comp needs a lot of swords.
- Stage 1-2: Play your strongest AD opener preferably around an IE slam. If you don’t have a great opener look to loss streak and collect swords on carousel for BIS.
- Stage 3: Look to continue collecting items for Nidalee and Sivir. If you highrolled 2 Primal consider the item buff as you will likely be able to farm all 4 components.
- Stage 4: Roll down aggressively on 4-2 to find Malphite and Sentinel before other players. Stage 4 is this comps tempo window so look to be as strong as possible.
- Stage 5+: Don’t level until you’ve 2 starred Nidalee, Sivir and Malphite unless you are very healthy and waiting for contestors to die. Go level 9 for Ashe or Taric when possible.
- Tips:
- Take the Execution Primal buff most of your games. If you are >50 HP and strong you can consider taking items.
- Primal Buff Prio: Execute > Healing > Attack Speed
- Kog’Maw’s Caustic trait provides Shred and Sunder so don’t build it when playing this comp.
- Beast’s Within allows you to take execute and items (the best 2 primal buffs for this comp) without having access to 4 Primal.
- Jeweled Lotus allows us to skip building IE on both Sivir and Nidalee and is a great augment for this comp.
- Itemization is flexible as long as it provides AD after IE is built. Prioritize at least 1 defensive item for Nidalee.
- Shojin Nidalee is very good as she deals bonus damage and heals herself every 3rd cast.
- Nidalee has a passive that allows her to target the lowest item count unit in a 3 hex range after getting a kill. This means position her weak side so she can potentially jump to unitemized back liners.
- Sacrifice a 3 cost, usually Krug, to give your Malphite maximum stats. The Krug alpha mark effect does not proc when it is sacrificed to Blackthorn so do not alpha mark him ever.
- Take the Execution Primal buff most of your games. If you are >50 HP and strong you can consider taking items.
Item Holder: Camille, Akali, Cinderling
Best Emblem/Spatula Holder: Hunter Nidalee
Items:
- Nidalee: IE, Shojin, Hand of Justice
- Deathblade, Striker’s, Giant Slayer
- Sivir: IE, Stiker’s, Red Buff
- Deathblade, Giant Slayer, Shojin, Blue Buff
- Malphite: Gargoyle’s, Spirit’s, Crownguard
- Sentinel: Leftover Tank, Vow, Adaptive Helm
Augments:
- BIS: Beast Within, Jeweled Lotus, Sword Overflow, Swordsmith, Carve a Path
- General: Item > Econ > Combat
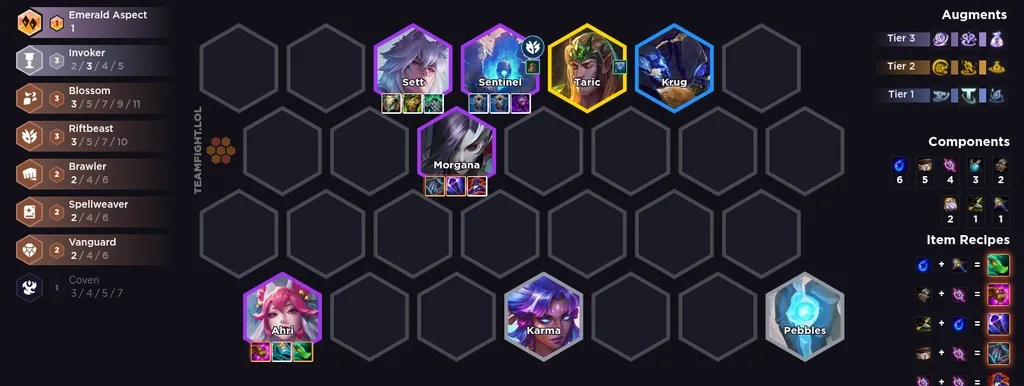
Invoker Morgana and Ahri
Copy Team Code
Leveling Pattern:
Fast 8/9
Win Streak
| Round | 2-1 | 2-5 | 3-1 | 3-5 | 4-2 | 5-2 |
| Level | 4 | 5 | 6 | 7 | 8 | 9 |
Lose Streak
| Round | 2-3 | 2-7 | 3-2 | 3-5 (40g+) | 4-1 | 5-5 |
| Level | 4 | 5 | 6 | 7 | 8 | 9 |
Mixed Streak
| Round | 2-1 or 2-3 | 2-5 or 3-1 | 3-2 | 3-5 or 4-1 | 4-2 | 5-5 or 6-1 |
| Level | 4 | 5 | 6 | 7 | 8 | 9 |
Conditions:
- Invoker Emblem Ahri bumps this up to S tier
- Lots of items
How to Play: Explorer
- Gameplan: This is a very item hungry comp that needs high quality items. Ahri and Morgana both have very strict item requirements. Ahri needs Jeweled Gauntlet and Morg needs both utility items. Frontline item quality is also important as Ahri and Morg need time to clear boards.
- Stage 1-2: Play around your strongest AP opener with a Jeweled Gauntlet slam. If you have Invoker Emblem already commit to this line. Item quality is very important in this line, if your items aren’t looking like they can reach BIS, look towards a different line.
- Stage 3: Save HP as a you can on stage 3 and prepare to roll down on 4-2 for Ahri 2 and Morgana 2. A 3-2 item augment helps save HP and to meet the steep item requirements.
- Stage 4: Roll for Ahri 2, Morgana 2 and 1 of Sentinel 2 or Sett 2. Being strong on this stage is very important but should be easy if you have high item quality.
- Stage 5+: Level to 9 for Taric, a Lux or more invoker levels after upgrading your board.
- Tips:
- Invoker Emblem is a great condition to force this comp.
- Position Ahri on the same side as enemy carries to kill them before enemy front line dies.
- Morgana needs Morello and Void Staff, they are very efficient on her and helps Ahri consistently kill back line in 2-3 casts. Her best 3rd item is Deathcap as it provides the most amount of flat stats.
Item Holder: Karma, Pebbles
Best Emblem/Spatula Holder: Invoker Ahri
Items:
- Ahri: Invoker Emblem**, Jeweled Gauntlet, Striker’s
- Shojin/Blue, Nashor’s
- Morgana: Void Staff, Morello/Red, Deathcap
- Any leftover AP after utility
- Sett: Generic Tank
- Sentinel: Protector’s Vow, Adaptive
Augments:
- BIS: Items
- General: Items = Emblems > Econ > Combat
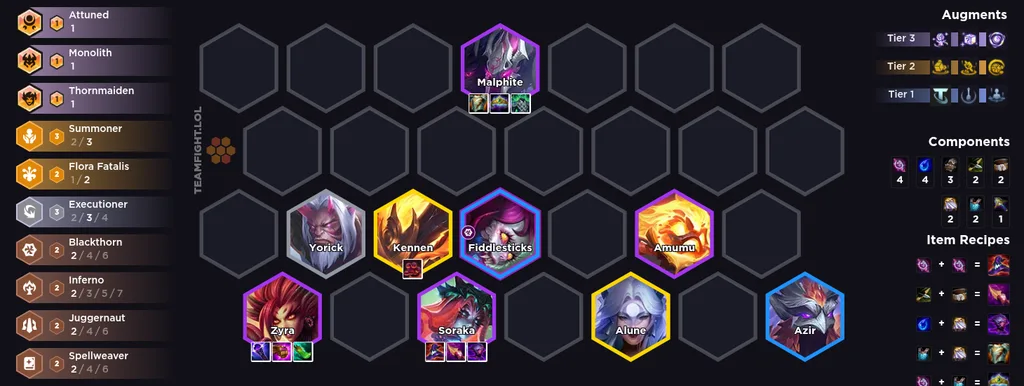
Flora Malphite
Copy Team Code
Leveling Pattern:
Fast 8/9
Win Streak
| Round | 2-1 | 2-5 | 3-1 | 3-5 | 4-2 | 5-2 |
| Level | 4 | 5 | 6 | 7 | 8 | 9 |
Lose Streak
| Round | 2-3 | 2-7 | 3-2 | 3-5 (40g+) | 4-1 | 5-5 |
| Level | 4 | 5 | 6 | 7 | 8 | 9 |
Mixed Streak
| Round | 2-1 or 2-3 | 2-5 or 3-1 | 3-2 | 3-5 or 4-1 | 4-2 | 5-5 or 6-1 |
| Level | 4 | 5 | 6 | 7 | 8 | 9 |
Conditions:
- Lots of AP items
- Great with emblems
- Flexible
How to Play: Explorer
- Gameplan: The goal of this comp is to keep Malphite alive as long as possible for Soraka and Zyra to scale into the fight. Flora Fatalis synergizes great with a solo front line unit as he is always likely to be the lowest % HP ally. The board is flexible and the only required units are Soraka, Zyra, Malphite, Azir and Fiddle.
- Stage 1-2: Play your strongest AP opener, ideally around Karma and Blossom to farm empowered wisps, but anything will do. If you are loss streaking prioritize rods on carousel.
- Stage 3: Continue to be strong if possible while collecting Malphite, Soraka and Zyra items. Do not slam too aggressively, item quality in this comp is very important. Malphite needs pure tank items while Soraka and Zyra each want a mana item.
- Stage 4: Roll aggressively for Malphite 2 on 4-2 as he will likely be contested. As stated above this comp only requires 5 core units so the 3 slots on level 8 are very flexible.
- Stage 5+: Go 9 and look for 5 cost. This comp can easily play almost any 5 cost but prioritize Kennen and 3 Executioner.
- Tips:
- Flora Fatalis is a front line trait for Malphite and is absolutely essential, this comp does not function the same without it.
- Sacrifice a 3 cost, usually Fiddlesticks, to give your Malphite maximum stats.
- There are multiple variants of this comp but Soraka, Zyra, Malphite, Azir and Fiddle are constants. 5 cost and emblems usually dictate what variations to go towards.
- Soraka launches more stars at her target if she has already casted on them previously so position her to hit main tanks.
- There are many great emblems for this comp. Consider augments like Trait Tree and Spreading Roots heavily for this line.
- If intend on playing Inferno, don’t prioritize making anti-heal.
- Emblems augments are great in this comp as it has a lot of hanging traits and can flex a lot of different traits.
Item Holder: Karma, Akali
Best Emblem/Spatula Holder: Executioner Zyra, Spellweaver Soraka, Juggernaut Malphite, Defender Malphite, Blackthorn Amumu
Items:
- Soraka: Deathcap, Nashor’s, Adaptive
- Shojin, Archangel
- Zyra: Jeweled Gauntlet, Void Staff, Shojin
- Malphite: Gargoyle’s, Crownguard, Spirit’s
- Kennen/Azir: Leftover AP
Augments:
- BIS: Emblem Generation
- General: Trait > Item > Econ > Combat
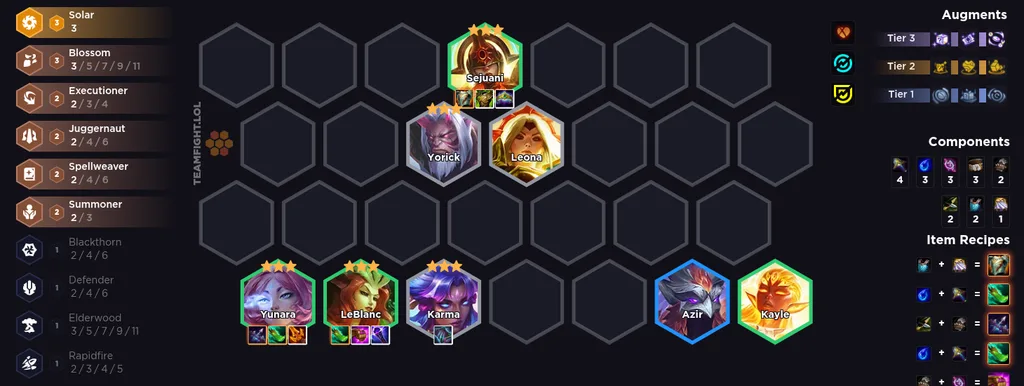
Solar Yunara
Copy Team Code
Leveling Pattern:
2 Cost Reroll
Lose Streak
| Round | 2-3 | 2-7 | 3-2 | 4+ | 5+ | 6+ |
| Level | 4 | 5 | 6 | 7 | 8 | 9 |
Other
| Round | 2-1 | 2-5 | 3-2 | 4+ | 5+ | 6+ |
| Level | 4 | 5 | 6 | 7 | 8 | 9 |
Level to 4 on 2-1 if you are strong/have a copy of the unit you are rerolling + a slammable item
Level to 5 on 2-5 if you are strong, if not make econ (20)
Level to 6 on 3-2 and roll to stabilize. You just slowroll from here.
Level 7 by 4-5 if possible (after you get 3*)
Level 8 5-2 if possible
Conditions:
- Lots of econ
- 2 Sets of carry items
How to Play:
- Gameplan: This is a very expensive comp that requires both 5 3 stars and reaching level 8. It also has a very steep item requirement. There is a lot of rolling both at level 5 and 6, this requires a lot of patience to be rich enough to level to 8.
- Stage 1-2: Play your strongest opener around 3 Blossom or LeBlanc. Having one of these engines early provides much needed econ for this expensive comp. Unlike most 1/2c reroll comps, you can consider leveling on 2-1 if it makes you strong enough to win, specially with a LeBlanc opener. This comp can tempo around both AD and AP items.
- Stage 3: Play 3 Blossom + LeBlanc and Sejuani on level 5 to farm both upgraded wisps and LeBlanc copies. Roll on level 5 for Karma 3 and Yorick 3. Once you have 1 and 7/9 copies of the other look to level to 6 and add Azir for Executioner + Summoner.
- Stage 4: Level to 6 on 4-1/4-2 and continue rolling for your 3 star 2 costs. If you are close to spiking consider digging for 3 stars as being strong leads to more LeBlanc clone copies which can greatly accelerate you.
- Stage 5+: Level to 7 and play 3 Solar over Azir. At level 8 add Azir. If you make it this far you are very likely top 2.
- Tips:
- You will be buying a wisp almost every turn with this comp. Blossom wisps are very strong and it’s worth digging for quality wisps on most turns.
- LeBlanc is a very important part to this comp as its half of the econ engine for an otherwise very expensive comp. Be as strong as you can on stage 3 and early 4 to print units with LeBlanc. If you fall behind on tempo, you fall behind on printing which leads to a reverse snowball.
- Item augments are required for this comp as they are the easiest way to be strong on stage 3 and 4. If you reach 3 item Yunara and LeBlanc you will get kills which snowballs you as mentioned above.
- With Prismatic Ticket you can consider playing for all 8 3 stars. Prioritize the ones highlighted above first.
Item Holder: LeBlanc, Yunara, Karma
Items:
- Yunara: Shojin, Last Whisper, Deathblade
- Giant Slayer, Striker’s
- LeBlanc: Shojin, Jeweled Gauntlet, Void Staff
- Karma: Utility items
- Sejuani: Gargoyle’s, Warmog’s, Crownguard
- Generic Tank
Augments:
- BIS: Prismatic Ticket
- General: Econ = Item > Combat
Dive into TFT Data
B Tier: Playable, but not Preferred. These comps could be strong if uncontested.
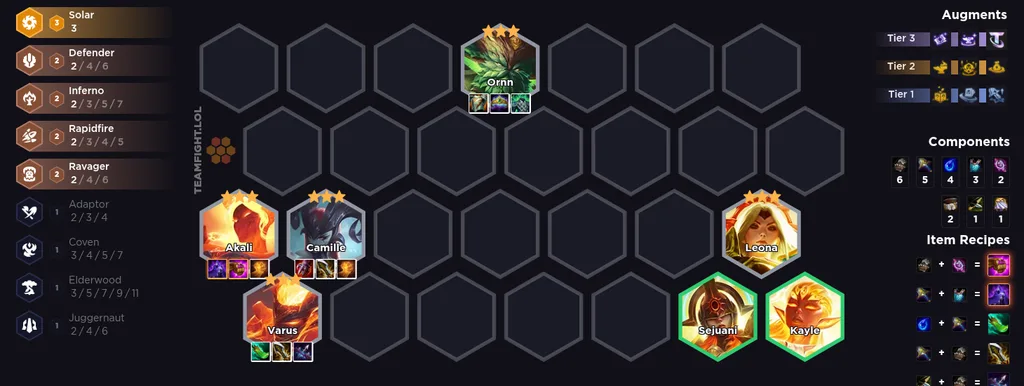
Solar Akali Reroll
Copy Team Code
Leveling Pattern:
1 Cost Reroll
Do not press the level button at all until you 3 star your 1 cost.
On Stage 3-1, at level 4, you can roll to 32g (most common), slow roll, or roll until you hit 3*.
Be flexible in when you roll, be willing to break econ intervals if you are close or need tempo. Ideally finish 1 3 star by 3-5.
All in on 4-1 if you haven’t hit already.
Conditions:
- Camille Akali opener
- Lots of Ornn Copies
- Goes up a tier with artifacts or reroll augments
How to Play: Explorer
- Gameplan: Play this from a premium reroll augment, artifacts or a lot of copies Camille, Akali and Ornn. If you don’t have one of these conditions make sure you are playing from a completely uncontested spot as missing is a death sentence in this comp.
- Stage 1-2: Play your strongest board around 2 Ravager with an Akali or Camille slam. Since Akali prefers to be AP and Camille is by default AD you should almost always have a slam for either one of them on 2-1. If you are playing this from loss streak you need a premium Reroll or econ augment.
- Stage 3: Roll down on 3-1 for upgrades, stop at 32 gold. If you get bench locked sell Leona copies first. Don’t hold excess Kayles or Sejuanis on this roll down focus on the 1 cost. Econ back up and slow roll for your board.
- Stage 4: Roll down again on 4-1 if you need to 3 star units, continue slow rolling if your carries + Ornn are already 3 star.
- Stage 5+:
- Tips:
- AP Akali recasts her spell on kill, setting her up to hit weak side of the enemy front line is key.
- Printing an artifact from Ornn’s Forge is very important to capping high with this comp. Ornn copies are as important as Akali and Camille copies.
- Range extension is very strong on both Akali and Camille, consider RFC and Fishbones heavily.
- Any augment that gives you free Rerolls is good for this line. Consider using free rolls aggressively on stage 2 to look for wisps such as Starting Town and cheat out upgrades.
- Kayle 3 and Sejuani 3 are not neccessary and often too expensive.
- If you have Inferno Emblem, careful when playing 3 Inferno as it can very often grief your first shop of the turn.
- Lich Bane Akali is the best artifact for this comp and is close to auto win.
- Hustler is very good for this comp. Roll on 2-1 and 2-2 to complete 1 cost pairs. Roll for a charm every turn on stages 2 and 3.
Item Holder: Akali, Camille, Ornn
Best Emblem/Spatula Holder: Rapidfire Camille, Defender Sejuani, Inferno anyone
Items:
- Akali: Edge of Night, Jeweled Lotus, Hand of Justice, Lich Bane*
- Artifact priority: Lich Bane > RFC > Seeker’s > Dawncore > Zhonyas
- Camille: Sterak’s, IE, QSS
- Fishbones > Mittens > Hellfire Hatchet > Titanic Hydra
Augments:
- BIS: Pandora’s Bench, Early Learnings, Portable Forge, Hustler
- General: Reroll > Item > Econ
Caitlyn Reroll
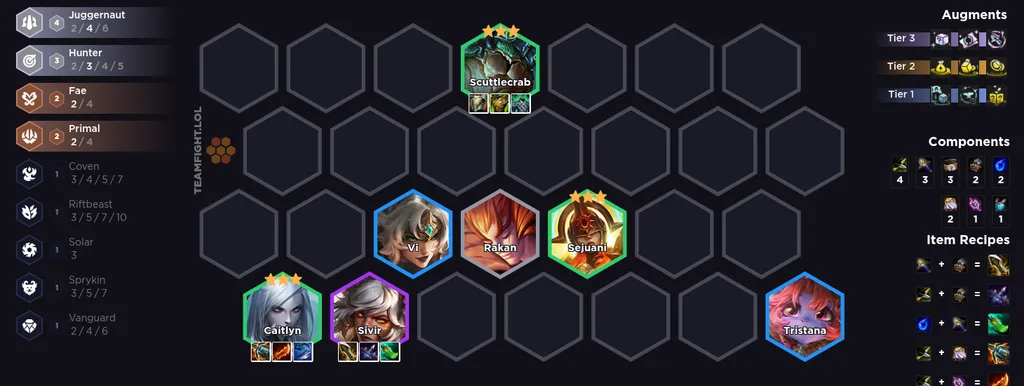
Copy Team Code
Leveling Pattern:
2 Cost Reroll
Lose Streak
| Round | 2-3 | 2-7 | 3-2 | 4+ | 5+ | 6+ |
| Level | 4 | 5 | 6 | 7 | 8 | 9 |
Other
| Round | 2-1 | 2-5 | 3-2 | 4+ | 5+ | 6+ |
| Level | 4 | 5 | 6 | 7 | 8 | 9 |
Level to 4 on 2-1 if you are strong/have a copy of the unit you are rerolling + a slammable item
Level to 5 on 2-5 if you are strong, if not make econ (20)
Level to 6 on 3-2 and roll to stabilize. You just slowroll from here.
Level 7 by 4-5 if possible (after you get 3*)
Level 8 5-2 if possible
Conditions:
- Guinsoo’s + Kraken Caitlyn
- 2 Sets of AD items
How to Play:
- Gameplan: Standard 2 cost reroll around Caitlyn. Caitlyn scales the best off attack speed so this comp requires multiple bows. Scuttle Crab 3 or Sejuani 3 can be main tanked.
- Stage 1-2: Play around a Caitlyn orb with Guinsoo’s or Kraken. If you find yourself with these slams but no Caitlyn’s you can consider pivoting in at 3-2. If you have Coven you can play it for a few turns but this comp does not want to play Coven deep into stage 3.
- Stage 3: Roll on 3-2 to stabilize around Caitlyn 2, 2 Hunter and 4 Juggernauts. If you have been playing Coven, look to pivot out by 3-5, don’t greed a huge cash out in this comp and instead aim to be strong on stage 3.
- Stage 4: Continue rolling for Caitlyn 3, Scuttle 3 and Sej 3. Look to level for more Hunters or Juggernauts after you hit 3 stars.
- Stage 5+: Go 9 for Ashe. If you reach Ashe with a Shojin, you have great top 2 potential.
- Tips:
- Hunters get 10% damage amp for hitting the same target for 4 seconds or longer so prioritize targeting the main tank down first to get full effectiveness from this passive.
- Caitlyn is a specialist and does not cast a spell making any mana item on her completely useless.
- Elise and Vanguards might give access to Coven cash outs but are substantially weaker than 3 star Juggernauts.
Item Holder: Caitlyn, Cinderling
Best Emblem/Spatula Holder: Hunter Draven, Hunter Gnar, Hunter Brambleback
Items:
- Caitlyn: Guinsoo’s, Kraken, Giant Slayer
- Deathblade, 2x Kraken
- Scuttle Crab: Warmogs, Gargoyle, Spirit’s
- Generic Tank
- Sejuani: Leftover Tank
- Sivir: Last Whisper, Leftover AD
Augments:
- General: Items > Econ > Combat
Veigar Reroll
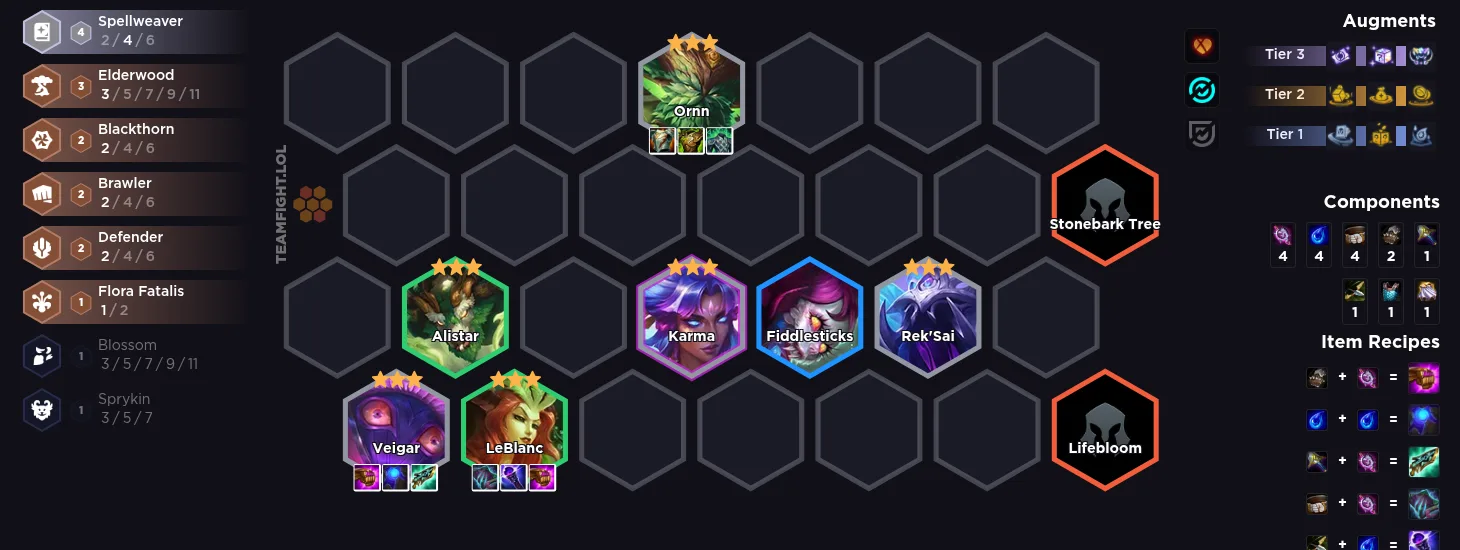
Copy Team Code
Leveling Pattern:
1 Cost Reroll
Do not press the level button at all until you 3 star your 1 cost.
On Stage 3-1, at level 4, you can roll to 32g (most common), slow roll, or roll until you hit 3*.
Be flexible in when you roll, be willing to break econ intervals if you are close or need tempo. Ideally finish 1 3 star by 3-5.
All in on 4-1 if you haven’t hit already.
Conditions:
- Artifacts or Emblems
- Consuming Flora
- Early LeBlanc and Ornn
How to Play:
- Gameplan: This comp is ideally played from a special condition such as Consuming Flora or an artifact or a lot of Veigar or Ornn copies with good slams. Veigar needs to get going early and start snowballing, if not you will not have enough AP to get through stage 4 and 5 front lines. This comp also needs a duo carry as Veigar is prone to getting stuck on front liners like Malphite.
- Stage 1-2: Play around your stronger opener with Veigar 2 and look to farm some AP on Veigar. Ideally we are playing from an Artifact or Consuming Flora + a slam so we should be 2 item Veigar on 2-1. A LeBlanc and Ornn opener can work as well to make progress towards an artifact.
- Stage 3: Roll on 3-1 for Veigar, Ornn, Karma and Rek’Sai copies. Stay above 40 gold. Slowroll from here on out unless you are 1 or 2 copies off, in which case consider digging. Buy a wisp every turn this stage. Feed Lifebloom not Karma at this point.
- Stage 4: If you finish your 1 cost 3 stars and don’t have many LeBlanc copies consider pushing, if you are close consider staying at 6 as feeding LeBlanc 3 to Blackthorn can be a late game win condition.
- Stage 5+: Level and add more Spellweavers. Duo carry Ahri or Alune and look to feed LeBlanc 3 for mana. Once you’ve farmed an artifact, move your items to Alistar 3.
- Tips:
- If you hit Veigar 3 way before anything else consider pushing levels to maintain tempo. You can use Malphite as a frontline alternative.
- Blackthorn Feed Priority:
- Leblanc 3> Karma 3 > Cassiopeia 2
- Don’t feed LeBlanc 3 if you are missing 3 stars and have items for her. Feed her when you have a good replacement like Ahri.
- Alistar 3 is not required but very tanky. Move your items from Ornn after printing an artifact. You do not have to spend time rolling for him if you 3 star LeBlanc first as she will print him as you level.
- The normal Flora Fatalis emblem is not good enough for this line. You need the special Consuming Flora emblem for Veigar to be strong enough.
Item Holder: Veigar
Best Emblem/Spatula Holder: Flora Fatalis Veigar
Items:
- Veigar: Jeweled Gaunlet, Blue Buff/Shojin
- Consuming Flora > Dawncore > Eternal Pact > Radiant Blue Buff
- LeBlanc: Utility, Shojin, leftover AP
- Ornn/Alistar: Gargoyles, Generic Tank
Augments:
- BIS: Consuming Flora, Portable Forge
- General: Emblem > Item > Econ > Combat
Blossom Ahri
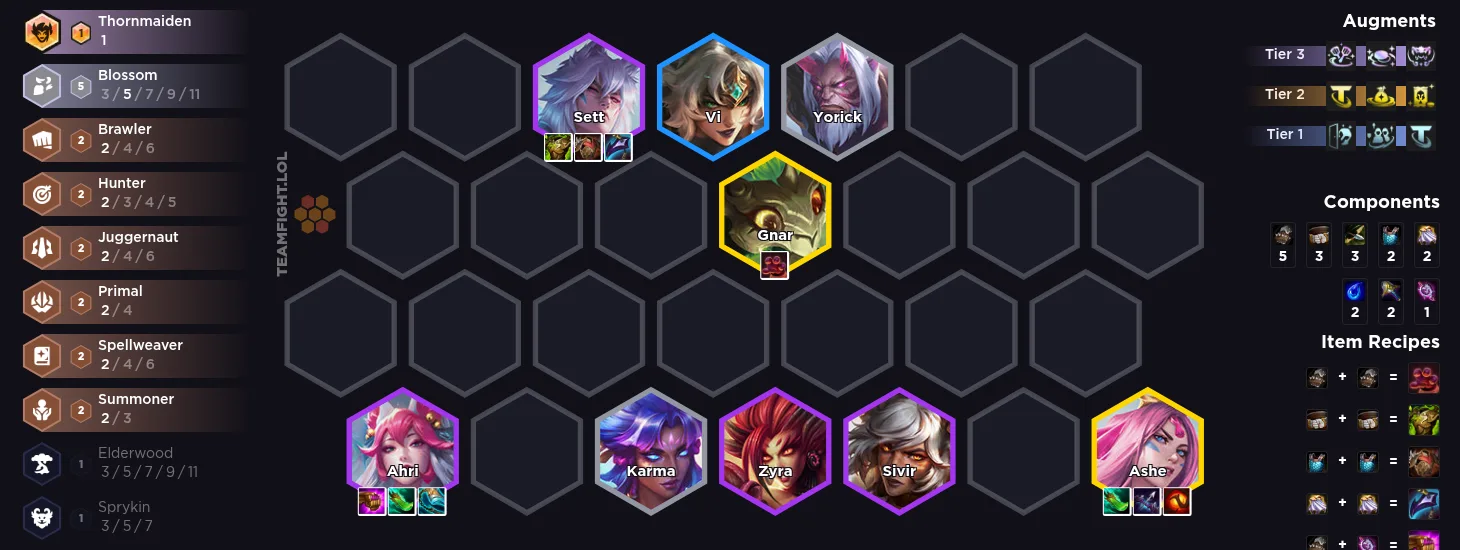
Copy Team Code
Leveling Pattern:
Fast 8/9
Win Streak
| Round | 2-1 | 2-5 | 3-1 | 3-5 | 4-2 | 5-2 |
| Level | 4 | 5 | 6 | 7 | 8 | 9 |
Lose Streak
| Round | 2-3 | 2-7 | 3-2 | 3-5 (40g+) | 4-1 | 5-5 |
| Level | 4 | 5 | 6 | 7 | 8 | 9 |
Mixed Streak
| Round | 2-1 or 2-3 | 2-5 or 3-1 | 3-2 | 3-5 or 4-1 | 4-2 | 5-5 or 6-1 |
| Level | 4 | 5 | 6 | 7 | 8 | 9 |
Conditions:
- Item Augments
- Early Blossom
- Ability to go 9
How to Play:
- Gameplan: 3 Blossom is one of the stronger openers in the game due to empowering wisps. If you have an AP slam, 3 Blossom and Karma 2 consider playing this line. Getting to Ashe is key as this comp falls off if you’re stuck on level 8.
- Stage 1-2: Be strong around a Blossom opener and an AP slam. Karma is very strong but Yunara is not so having an AP slam is preferable to an AD one. It’s also more consistent to itemize Ahri first.
- Stage 3: Continue to be strong, ideally with 5 Blossom to see wisps every turn. Click on most econ wisps but only buy combat wisps if you’re protecting a streak or they cost 1 or less gold.
- Stage 4: Roll on 4-2 for Ahri 2, Sett 2. Make sure to not make luxury upgrades such as unitemized an Sivir 2 or Zyra 2 if you haven’t found Ahri and Sett and are lacking in econ. Play Krug for Brawler before finding Gnar.
- Stage 5+: Level for Ashe and Gnar. Yorick and Karma are replaceable by 5 costs such as Alune and Maokai
- Tips:
- You can’t toggle in Blossom, to get an upgraded wisp you must field 3 Blossom for a combat.
- If you have an Emblem or highroll Ashe on 8 play 7 Blossom as long as possible to make going 9 easier.
- Ahri prioritizes clumps but has good odds of sniping backline if you are on the same side.
- Wisp Rebate is half of 7 Blossom and absolutely insane in this line.
- The core of this comp is Ahri with 3 Blossom and 2 Spellweaver, she is very flexible and playable on many boards.
- Ashe really wants caster items, prioritize a Shojin and a burn item like Red Buff or Morello as she hits most of the board.
Item Holder: Karma, Yorick
Best Emblem/Spatula Holder: Blossom Gnar, Blossom Zyra
Items:
- Ahri: Shojin, Jeweled Gauntlet, Striker’s
- Deathcap, 2x Jeweled Gauntlet, Blue Buff
- Sett: Warmogs, Bramble, Dragon’s Claw
- Gargoyle’s, Adaptive Helm
- Ashe: Red Buff/Morello, Shojin, Last Whisper
Augments:
- BIS: Wisp Rebate
- General: Econ = Item > Combat
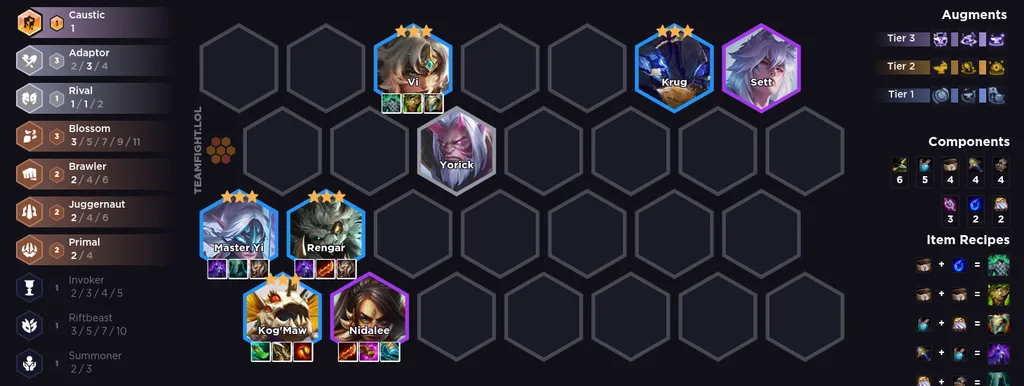
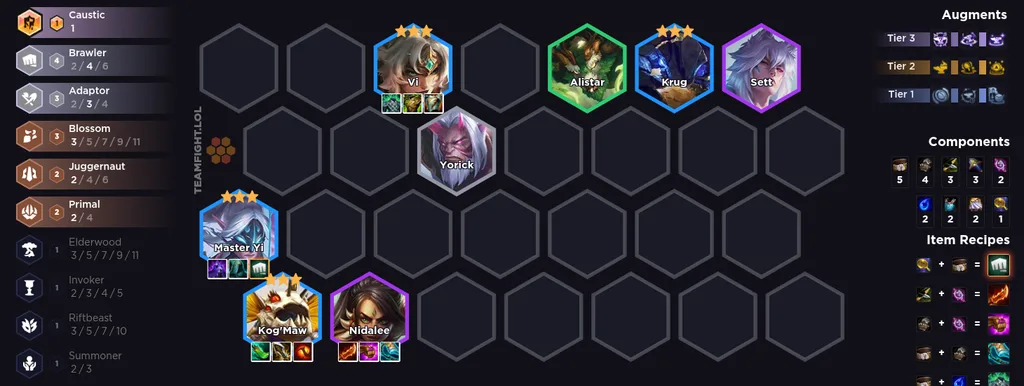
Adaptor Reroll
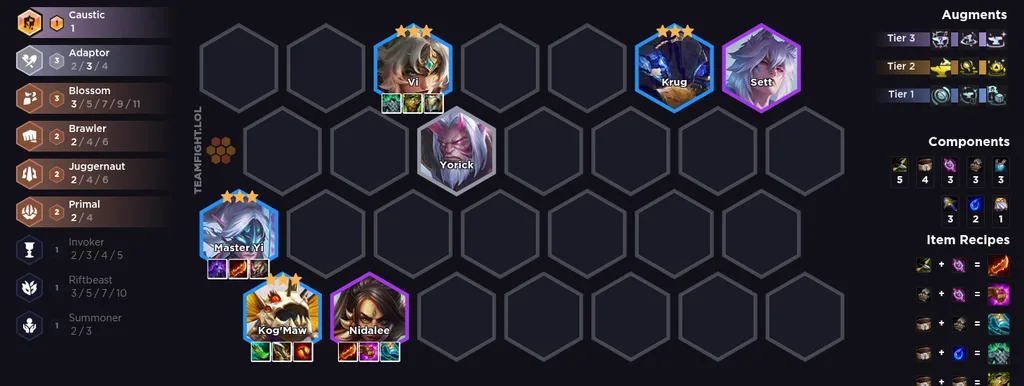
Copy Team Code
Copy Team Code
Copy Team Code
Copy Team Code
Leveling Pattern:
3 Cost Reroll
Lose Streak
| Round | 2-3 | 2-7 | 3-2 | 3-5 (40g+) | 5+ | 6+ |
| Level | 4 | 5 | 6 | 7 | 8 | 9 |
Other
| Round | 2-1 | 2-5 | 3-2 | 3-5 or 4-1 | 5+ | 6+ |
| Level | 4 | 5 | 6 | 7 | 8 | 9 |
Level to 4 on 2-1 if you are strong/have a copy of the unit you are rerolling + a slammable item
Level to 5 on 2-5 if you are strong, if not make econ (20)
Level to 6 on 3-2
Level to 7 3-5 If you have an econ Augment
Level to 7 4-1 and hit your carry 2-star to stabilize.Mixed Streak
Conditions:
- Artifacts Bump this up a tier
- Ability to 3 star Yi and a front liner
- A lot of bows
- Rengar Orb
How to Play:
- Gameplan: Play around a Yi, Rengar orb or a 2-1 artifact to get into this line. Master Yi is a stat stick that needs to either hit before tempo or have a special item to perform. Rengar is a great duo carry that can accelerate your econ but is very item specific and inconsistent to play for from behind. Non-Rengar Yi is AP, Yi Rengar is AD.
- Stage 1-2: Play your strongest board around an early Yi or Rengar and 3 Blossom or an Artifact holder. Do not hard commit to this line unless you have an Artifact, uncontested Rengar line or Bruiser Emblem.
- Stage 3: If by 3-2 the Yi set up looks inconsistent look to pivot to a 4 cost line. If you have a strong stage 3 Yi or Rengar set up use the tempo to econ up to roll for Yi 3 on stage 4.
- Stage 4: Slow roll for Yi, Kog’Maw, Rengar and a 3 star front liner. If you don’t have a special item you will likely struggle against upgraded 4 cost boards unless you can cheat out a 3 star ahead of tempo.
- Stage 5+: Complete your 3 stars and push for more Adaptor trait levels. If you reach 3 item Yi, Kog’Maw, Tank and Rengar you are in a great spot to top 2.
- Tips:
- Nidalee 2 is a enough to cover backline damage if you miss on Kog’Maw 3 but Yi 3 is absolutely non-negotiable.
- This comp doesn’t do great from behind so make sure you have a very good condition if you are playing it from loss streak.
- Take the Healing Primal buff most of your games. If you are >50 HP, strong and have a consistent way for Nidalee to get takedowns, you can consider taking items.
- Primal Buff Prio: Healing > Attack Speed > Execute
- If you have a Yi already and see Cooking Pot use it to make Brawler Emblem and feed your Yi HP till 3-5 where you will likely spike.
- Rengar is the best duo carry for Yi and his items should be prioritized, however they are not very flexible. Guinsoo’s is required and so is Edge of Night. Only consider Rengar if you have him early enough or have the item economy to support him even.
- Rengar can go in over Nidalee if you are not farming items from Primal or need the combat buff. If not consider dropping Krug.
- AD Yi wants QSS as Guinsoo’s provides AP which can force him into the incorrect Adaptor form.
- AP Yi wants Guinsoo’s as its the best scaling attack speed source available and the AP ensures he’s in the correct Adaptor form
Item Holder: Master Yi, Kog’Maw
Best Emblem/Spatula Holder: Brawler Master Yi
Items:
- AP Master Yi: Guinsoo’s, Edge of Night, Titan’s
- Special Item Priority: Wit’s End > Hellfire Hatchet > Flickerblade > Fishbones > RFC > Brawler Emblem > Titanic
- Everything replaces Titan’s except for Flicker which replaces Guinsoo’s
- Special Item Priority: Wit’s End > Hellfire Hatchet > Flickerblade > Fishbones > RFC > Brawler Emblem > Titanic
- AD Master Yi: QSS, Edge of Night, Titan’s
- Special Item Priority: Hellfire Hatchet > Fishbones > RFC > Brawler Emblem > Titanic
- Rengar: Guinsoo’s, Edge of Night, Titan’s
- Kog’Maw: IE, Shojin, Red Buff
- Nidalee: Guinsoo’s, Leftover AP or AD
- Vi: Gargoyle’s, Warmogs, Spirit’s
- Krug: Leftover Tank
Augments:
- BIS: Artifact Generation, Cooking Pot
- General: Item > Reroll > Econ > Combat
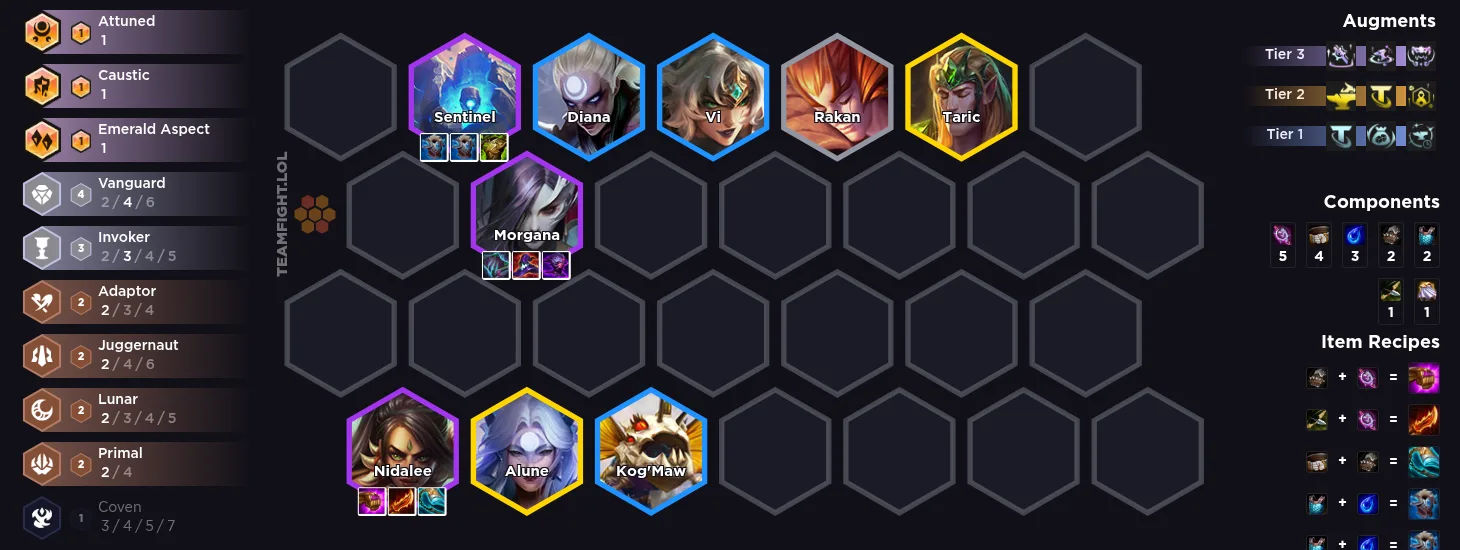
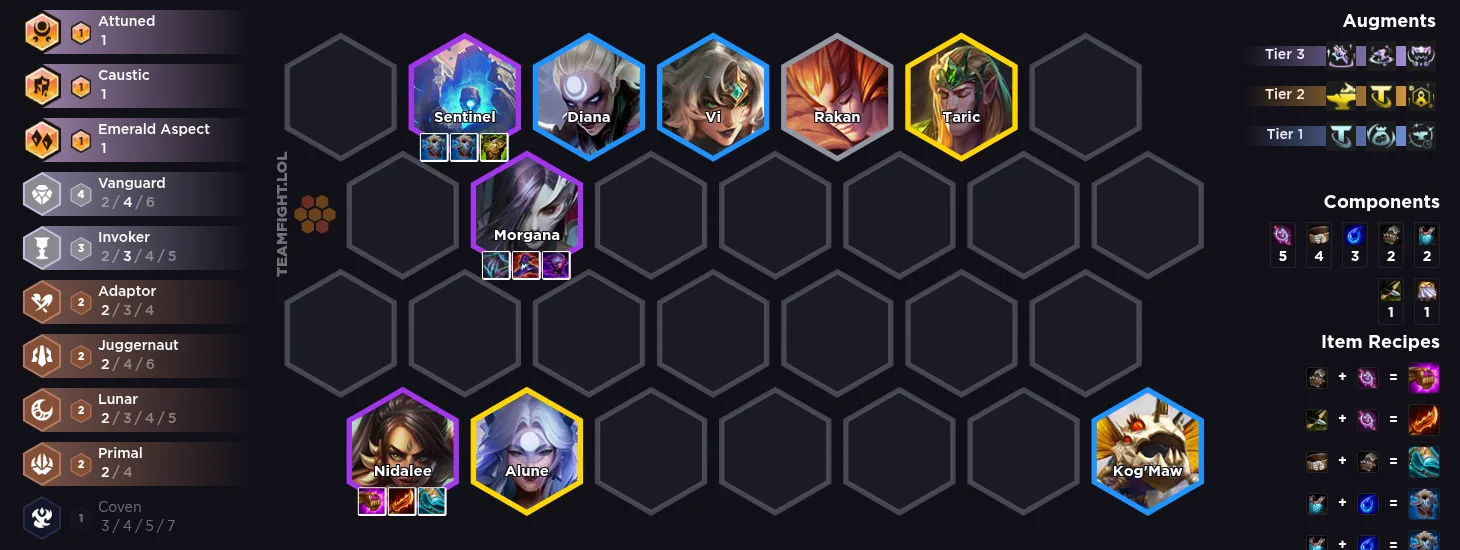
Invoker Nidalee
Copy Team Code
Copy Team Code
Leveling Pattern:
Fast 8/9
Win Streak
| Round | 2-1 | 2-5 | 3-1 | 3-5 | 4-2 | 5-2 |
| Level | 4 | 5 | 6 | 7 | 8 | 9 |
Lose Streak
| Round | 2-3 | 2-7 | 3-2 | 3-5 (40g+) | 4-1 | 5-5 |
| Level | 4 | 5 | 6 | 7 | 8 | 9 |
Mixed Streak
| Round | 2-1 or 2-3 | 2-5 or 3-1 | 3-2 | 3-5 or 4-1 | 4-2 | 5-5 or 6-1 |
| Level | 4 | 5 | 6 | 7 | 8 | 9 |
Conditions:
- Lots of items
- Be willing to flex the front line
How to Play:
- Gameplan: This comp is very item hungry and contests Sentinel and Morgana which are very popular right now. You need at least 1 econ augment and 1 item augment to meet these condition reliably. Be flexible on 4-2 as you will not always hit Sentinel.
- Stage 1-2: This comp is ideally played from an AP item slam such as Jeweled Gauntlet, Morello or Guinsoo’s. Almost any opener that can hold these items will do as the only relevant low cost unit is Rakan.
- Stage 3: Continue to be strong by slamming items. If you to clicked econ 2-1, look to click items 3-2 and vice versa.
- Stage 4: Level on 4-2 and look for Morgana, Nidalee and Sentinel + a supporting board. Be flexible and don’t fully commit to 4 Vanguards unless you hit Sentinel 2 or Taric. Consider Amumu which ties in with Rakan and removing 2 Sentinels for Sett + Krug/Gnar.
- Stage 5+: Go 9 and look for Alune and Taric to cap out. Replace low quality items with heavier AP ones as you get them on Morgana.
- Tips:
- Take the Execution Primal buff most of your games. If you are >50 HP you can consider taking items.
- Nidalee’s itemization is more specific than Morgana’s, however it does not make Morgana’s item quality any less important. Nidalee needs Guinsoo’s and ideally Jeweled Gauntlet to shine. Morgana requires Morello. This means this comp needs 3 rods at a minimum but the more the better.
- Flex the front line, the only static units are Nidalee, Vi, Morgana, Kog’Maw, Sentinel +1 Vanguard. The rest can be whatever you 2 star on your roll down.
- Kog’Maw’s Caustic trait provides Shred and Sunder but it is OK to build it Void Staff on Morgana as she hits more of the board.
- Beast’s Within allows you to take execute and items (the best 2 primal buffs for this comp) without having access to 4 Primal and bumps this comp up a tier.
Item Holder: Karma
Best Emblem/Spatula Holder: Invoker Nidalee
Items:
- Nidalee: Guinsoo’s, Jeweled Gauntlet, Striker’s
- Deathcap, Giant Slayer
- Morgana: Morello
- Leftover AP, ideally Deathcap
- Sentinel: Vow, Adaptive Helm
Augments:
- BIS: Beast Within
- General: Items > Econ > Combat
Cassiopeia Reroll
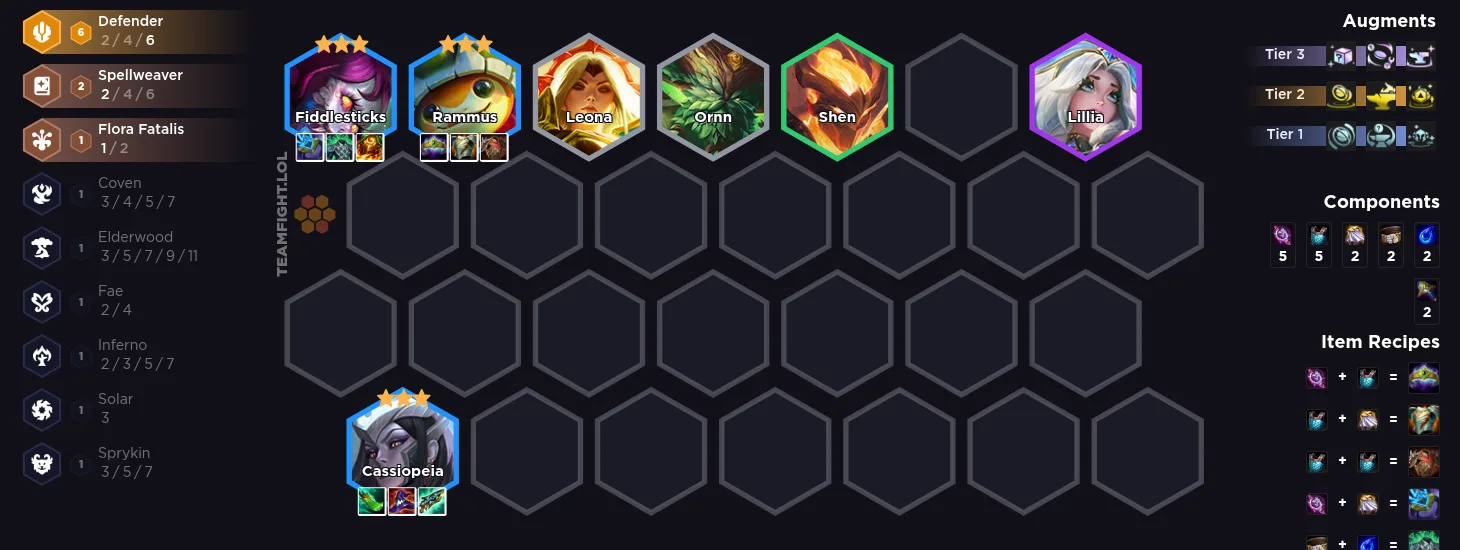
Copy Team Code
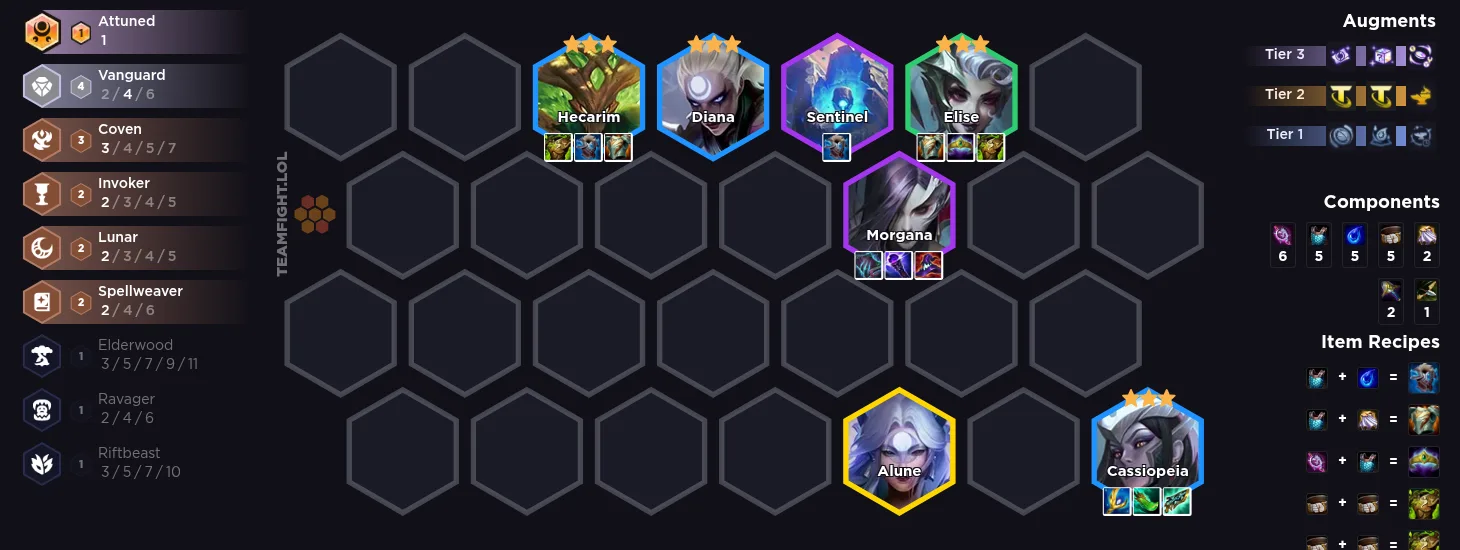
Copy Team Code
Leveling Pattern:
3 Cost Reroll
Lose Streak
| Round | 2-3 | 2-7 | 3-2 | 3-5 (40g+) | 5+ | 6+ |
| Level | 4 | 5 | 6 | 7 | 8 | 9 |
Other
| Round | 2-1 | 2-5 | 3-2 | 3-5 or 4-1 | 5+ | 6+ |
| Level | 4 | 5 | 6 | 7 | 8 | 9 |
Level to 4 on 2-1 if you are strong/have a copy of the unit you are rerolling + a slammable item
Level to 5 on 2-5 if you are strong, if not make econ (20)
Level to 6 on 3-2
Level to 7 3-5 If you have an econ Augment
Level to 7 4-1 and hit your carry 2-star to stabilize.Mixed Streak
Conditions:
- Early Cassiopeia
- 2 sets of tank items
- Artifacts and Emblems bump this up a tier
How to Play:
- Gameplan: Play from a Cassio + Defenders opener. Very strong with special conditions such as Blighting Jewel and Consuming Flora or in cases you can cheat out an early Cassio 3. Play Vanguards if you have a Coven opener.
- Stage 1-2: Play around Defenders + Cassio or an AP item holder like Karma. BIS is very important so consider pivoting if reaching these items seems unrealistic. Play Coven if offered and look to cash out for Cassio and Elise copies.
- Stage 3: Look to stabilize on 3-5 if necessary around 6 Defender and Cassio 2. If you are playing Coven, look to cash out at 130 stacks and stabilize. Big cash outs are too greedy and miss this comps tempo window which is early stage 4.
- Stage 4: Slowroll for Cassio 3, Rammus 3 and Fiddlesticks 3. Take a 4-2 augment that either rushes a 3 star or provides you with enough items for 2 tanks. Continue clicking 40 cashes to farm copies if you are the Vanguard variant.
- Stage 5+: Continue to roll if you haven’t hit already. Level for 2 Flora Fatalis to supplement front line. Alune or a spellweaver go in at 8 for Vanguards.
- Tips:
- Place Fiddlesticks on the outside and Rammus directly next to him. Rammus’ ability taunts enemies forcing them to attack him which means you can juggle enemy aggro this way and allow Fiddle to heal back up with his spell.
- Cassio needs BIS. Her DPS is much lower without Deathcap or Archangel’s, Gunblade is needed to provide enough stall. Blue Buff and Shojin are interchangeable but one of the 2 is required.
- If you are playing this comp from Coven, play the vanguard variant. Cash out a 130 for a chance at Cassio 2 or some components. Continue to take every 40 cash from there for a chance at Cassio or Elise.
- If you have a Defender Emblem consider playing a Rengar if you see him early enough. If not play Soraka over a 1 cost defender.
Item Holder: Karma, Pebbles
Best Emblem/Spatula Holder: Flora Fatalis Cassiopeia, Defender Rengar, Defender Soraka
Items:
- Cassiopeia: Gunblade, Deathcap/Archangel’s, Shojin/Blue Buff
- Blighting Jewel > Consuming Flora Emblem > Rdiant Blue > Dawncore
- All of these replace a mana item.
- Blighting Jewel > Consuming Flora Emblem > Rdiant Blue > Dawncore
- Rammus: Gargoyle’s, Crownguard, Bramble
- Fiddlesticks: Sunfire, Spark, Spirit Visage
- Utility Tank
- Elise: Gargoyle’s, Crownguard, Warmogs
Augments:
- BIS: Consuming Flora
- General: Items > Reroll > Econ > Combat
Riftbeast Reroll
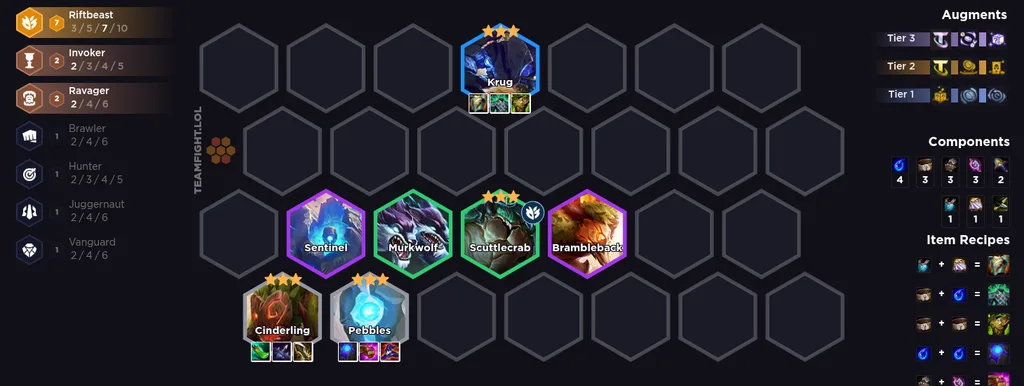
Copy Team Code
Leveling Pattern:
3 Cost Reroll
Lose Streak
| Round | 2-3 | 2-7 | 3-2 | 3-5 (40g+) | 5+ | 6+ |
| Level | 4 | 5 | 6 | 7 | 8 | 9 |
Other
| Round | 2-1 | 2-5 | 3-2 | 3-5 or 4-1 | 5+ | 6+ |
| Level | 4 | 5 | 6 | 7 | 8 | 9 |
Level to 4 on 2-1 if you are strong/have a copy of the unit you are rerolling + a slammable item
Level to 5 on 2-5 if you are strong, if not make econ (20)
Level to 6 on 3-2
Level to 7 3-5 If you have an econ Augment
Level to 7 4-1 and hit your carry 2-star to stabilize.Mixed Streak
Conditions:
- Pebbles or Cinderling copies
- Early 5 Riftbeast
- Combat and Item augments
How to Play:
- Gameplan: Play around a strong Riftbeast opener and look to tempo into 7 Riftbeast. The good for this comp are very obvious (copies, a slam and access to 5 Riftbeast). If you do not have easy access to these conditions play something else.
- Stage 1-2: Play around Cinderling or Pebbles 2 with a slam. Look to hold every extra copy possible. Level for 5 Riftbeast by 2-5 if you have it. Having access to a Scuttle Crab makes stage 2 a lot easier to survive.
- Stage 3: 3-1 is the latest point to put in 5 Riftbeast as you are not allowed to roll for Pebbles or Cinderling and instead have to push levels. Getting to 7 Riftbeast is the highest priority.
- Stage 4: Level to 7 on 4-1 for 7 Riftbeast. Slowroll on this level and look for Krug 3 and any other 3 star Riftbeast you are able to itemize. The Riftbeast shops will give you Pebble 3 and Cinderling 3 eventually. Krug 3 is the key to allow 7 Riftbeast to scale. If you are way above tempo and are very healthy, consider sacking stage 4 and going level 9 to play around 7-10 Riftbeast around Elder Dragon.
- Stage 5+: Level after finishing Krug 3 and look to add supporting traits to your board. 2 Brawler is the most likely to help as it allows you to scale into fights with a little more safety.
- Tips:
- Cinderling > Pebbles but both can do a tremendous amount of work. Cinderling only needs some AD caster items while Pebbles requires near bis.
- Always Alpha Mark Scuttle Crab or Krug 3 as it allows you to stall for longer and scale up 7 Riftbeast.
- Omega Riftbeast allows you to Alpha Mark Pebbles and Scuttle Crab allowing you to play for the Pebbles infinite without sacrificing front line.
Item Holder: [early game units]
Best Emblem/Spatula Holder:
Items:
- Cinderling: IE, Shojin/Blue, Last Whisper
- Deathblade, Striker’s
- Pebbles: Blue Buff, Archangel’s/Deathcap
- Jeweled Gauntlet, Adaptive
- Krug: Generic Tank
Augments:
- BIS: Omega Riftbeast, Verticality
- General: Item = Combat > Econ
Need to climb?
C Tier and Below: These are compositions that are weak, but if they are given to you, you might be forced to play them.
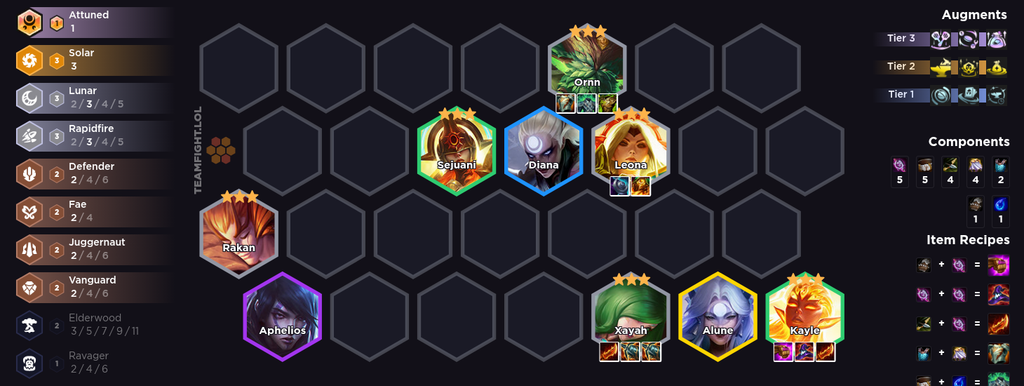
Kayle Reroll
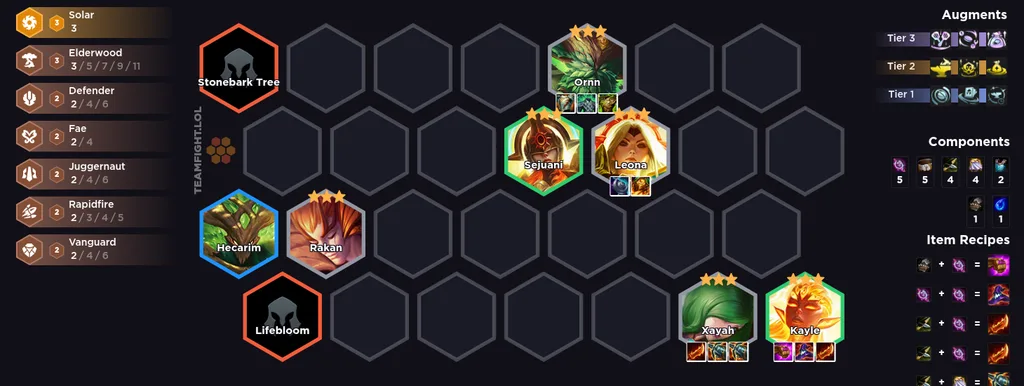
Copy Team Code
Copy Team Code
Leveling Pattern:
1 Cost Reroll
Do not press the level button at all until you 3 star your 1 cost.
On Stage 3-1, at level 4, you can roll to 32g (most common), slow roll, or roll until you hit 3*.
Be flexible in when you roll, be willing to break econ intervals if you are close or need tempo. Ideally finish 1 3 star by 3-5.
All in on 4-1 if you haven’t hit already.
Conditions:
- S Tier with Cursed Crown
- Strong Kayle or Xayah opener
- Lots of Items
- Lots of Econ
How to Play:
- Gameplan: This comp must 3 star 5 total units to come online. Kayle caps incredibly high if you are able to 3 star her along with 4 other units. Having items in the early mid game is incredibly important to stack up Ornn’s Forge and save HP, so we prioritize item augments.
- Stage 1-2: Ideally play this comp from a lot of econ or a strong opener around Kayle or Xayah. If you are able to save HP in stage 2 you get a lot of room to make up for any lowrolls on stage 3 and 4. Scout and make sure you are not contested, if you are look to pivot.
- Stage 3: If you are missing 1 cost upgrades, dig on level 4 on 3-1 to finish any pairs. Otherwise play slow and roll on 3-2 at level 5 for good odds at both 1 cost and 2 costs.
- Stage 4: Continue rolling for your 3 stars. Once you have Ornn, Xayah and 1 of Rakan or Leona, look to level to 6 and roll there for better 2 cost odds.
- Stage 5+: Level for Hecarim and more Rapidfire trait levels. If you make it to 9 drop Hecarim for 3 Lunar to activate Eclipse. If you made it this far, you likely are top 2.
- Tips:
- If you have Cursed Crown you can reroll for 8 3 stars much more comfortably as you can field everything you need at level 6. This can be absolutely game winning if you get there and being up 2 unit slots provides enough tempo to do this consistently.
- If you get bench locked always sell first Sejuani, followed by Rakan. Never sell Kayle, Ornn or Xayah.
- Be patient playing this comp, if you hit all 5 3 stars you will be strong. Don’t panic and rolldown too early and limit your scaling.
- If you have an extra Vow or tear tank item, Rakan is a great holder as his cast gives your Kayle attack speed.
- Roll aggressively for high value wisps when playing this comp. You can accelerate your game greatly by being picky with your wisps and potentially high rolling wisps such as Starting Town and Field of Mice.
- Field of Mice is an incredibly powerful wisp that provides 1 cost duplicators if you field 5+ 1 cost. Make sure to play 5 1 cost as soon as possible and look for this OP wisp.
Item Holder: Xayah, Kayle, Ornn
Best Emblem/Spatula Holder: Fae Kayle, Elderwood Sejuani, Elderwood Leona
Items:
- Kayle: Guinsoo’s, Jeweled Gauntlet, Deathcap
- Gunblade, Archangel’s, Red Buff
- Xayah: Guinsoo’s, leftover AD
- Ornn: Warmogs, Gargoyle’s, Spirit’s
- Generic Tank
- Rakan: Protector’s Vow
Augments:
- BIS: Cursed Crown
- General: Econ = Item > Combat
Very Special Tier: These comps require an augment and are Very Good
Special Tier: These comps require an augment and are playable or good
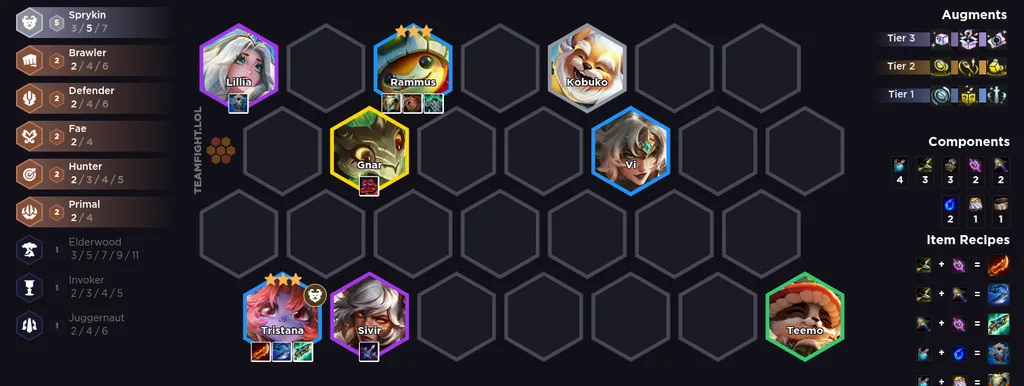
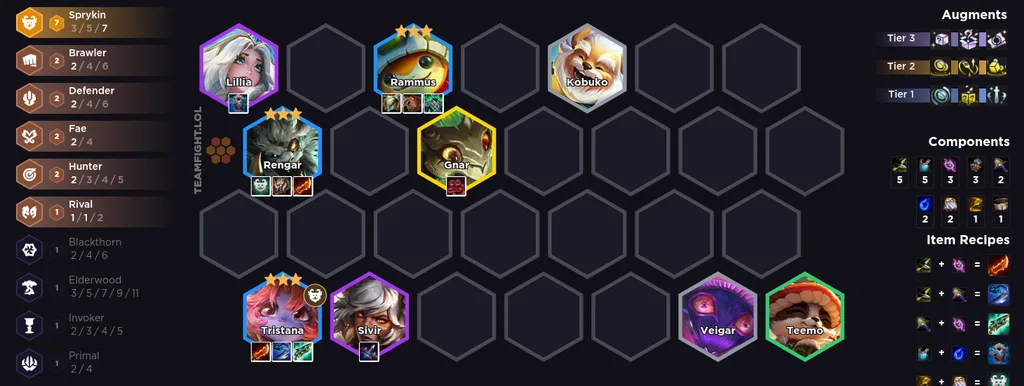
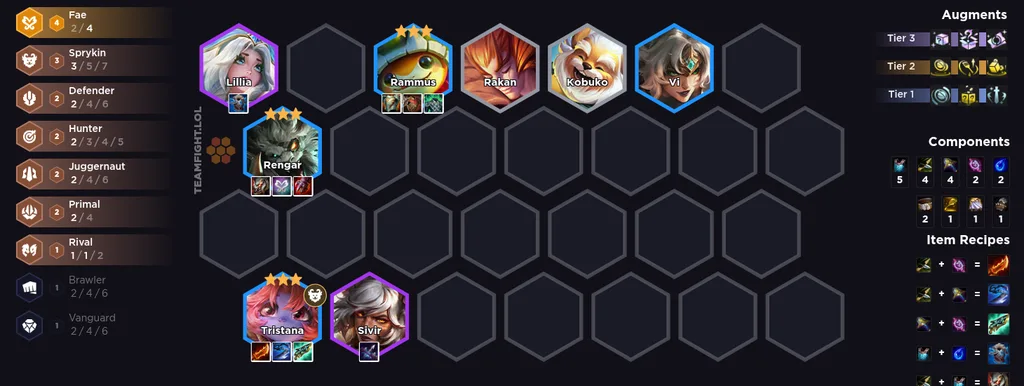
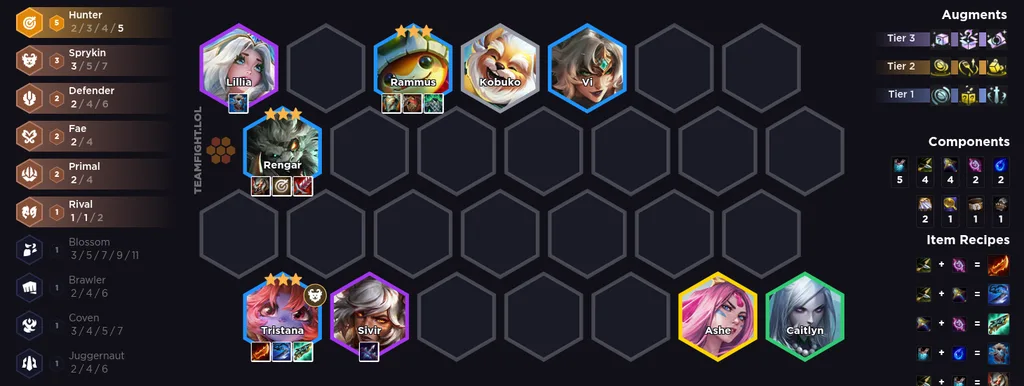
Tristana Rengar Reroll
Copy Team Code
Copy Team Code
Copy Team Code
Copy Team Code
Leveling Pattern:
3 Cost Reroll
Lose Streak
| Round | 2-3 | 2-7 | 3-2 | 3-5 (40g+) | 5+ | 6+ |
| Level | 4 | 5 | 6 | 7 | 8 | 9 |
Other
| Round | 2-1 | 2-5 | 3-2 | 3-5 or 4-1 | 5+ | 6+ |
| Level | 4 | 5 | 6 | 7 | 8 | 9 |
Level to 4 on 2-1 if you are strong/have a copy of the unit you are rerolling + a slammable item
Level to 5 on 2-5 if you are strong, if not make econ (20)
Level to 6 on 3-2
Level to 7 3-5 If you have an econ Augment
Level to 7 4-1 and hit your carry 2-star to stabilize.Mixed Streak
Conditions:
- Much stronger with Emblems
- Rengar Orb
How to Play:
- Gameplan: This comp should be played with an Emblem and ideally an early Rengar. If you have no special condition for this comp consider pivoting to something else. This is usually something you commit to on 2-1 around an emblem or Rengar orb. Rengar is the best holder of Sprykin, Hunter and Fae emblem.
- Stage 1-2: Play your strongest board around ideally a Rengar. The more you can scale up Rengar the easier it will be to scale into a game winning stat ball. Don’t be afraid to click something like Urf if you are able to immediately make a Fae or Sprykin +1.
- Stage 3: Continue to be strong. If you are playing this from loss streak level to 7 on 3-5 and look for Tristana, Rengar and a supporting board based on your emblems. If you are pivoting in this late make sure you are uncontested.
- Stage 4: Slow roll for 3 star Rengar, Tristana and a front liner. Roll aggressively for wisps that can accelerate your econ or offer tailored shops. Finding a Lilia is a very easy way to be stable on this stage so be willing to dig.
- Stage 5+: Level after hitting your 3 stars. Add Trait levels you are missing depending on your emblem.
- Tips:
- Sprykin Rider your Rengar if you have Sprykin emblem.
- Your emblem decides the version of the comp you play. They can all cap very high and net a top 2 if you reach the required 3 stars.
Item Holder: Rengar, Tristana, Xayah, Rakan
Best Emblem/Spatula Holder: Hunter, Sprykin, or Fae Rengar
Items:
- Tristana: Guinsoo’s, Gunblade, GS
- Deathblade, Kraken
- Rengar: Titan’s
- Fae: Sterak’s, Titans
- Hunter: BT, Titans
- Sprykin: Guinsoo’s Titans
- Rammus: Gargolyes, Generic Tank
Augments:
- BIS: Urf, Trait Tree, Spreading Roots, Branching Out
- General: Emblem > Item > Econ > Combat
Not Special Tier: These comps require an augment and are not that great or bad. Only play from an incredible spot
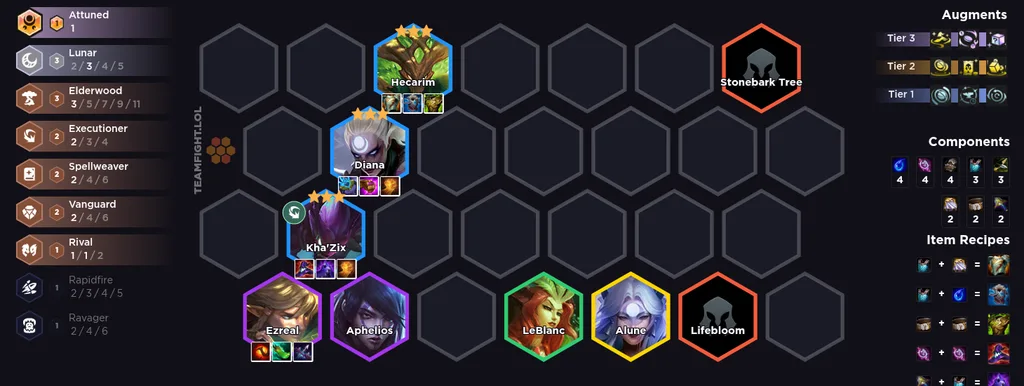
Kha’Zix Reroll
Copy Team Code
Leveling Pattern:
3 Cost Reroll
Lose Streak
| Round | 2-3 | 2-7 | 3-2 | 3-5 (40g+) | 5+ | 6+ |
| Level | 4 | 5 | 6 | 7 | 8 | 9 |
Other
| Round | 2-1 | 2-5 | 3-2 | 3-5 or 4-1 | 5+ | 6+ |
| Level | 4 | 5 | 6 | 7 | 8 | 9 |
Level to 4 on 2-1 if you are strong/have a copy of the unit you are rerolling + a slammable item
Level to 5 on 2-5 if you are strong, if not make econ (20)
Level to 6 on 3-2
Level to 7 3-5 If you have an econ Augment
Level to 7 4-1 and hit your carry 2-star to stabilize.Mixed Streak
Conditions:
- 2-1 to 2-3 Kha’Zix
- Edge of Night
- High tempo and lots of items
How to Play:
- Gameplan: Kha’Zix evolves at 8, 30, 60
- Stage 1-2:
- Stage 3:
- Stage 4:
- Stage 5+:
- Tips:
- Kha’Zix Trait Priority: Ravager > Executioner > Rapidfire > Spellweaver
- Ravager is first as it stabilizes the easiest, having some amount of healing on Kha’Zix
- Kha’Zix Trait Priority: Ravager > Executioner > Rapidfire > Spellweaver
Item Holder: [early game units]
Best Emblem/Spatula Holder:
Items:
- Kha’Zix: Edge of Night, Deathcap, Hand of Justice
- Lich Bane
Augments:
- BIS:
- General: [show order of trait, econ, item, combat with > order]

To get the latest video tutorials, head on over to my channel at https://youtube.com/bunnymuffins
FAQ
- How are compositions ranked?
- There are many factors, but the two strongest ones are how often they can be played and how strong they are when you get it. Think of it like frequency of being played combined with how well it can potentially do.
- I also rank them based on how often the best players in the world play each comp (top 10 players in major regions)
- Why isn’t XYZ Comp here?
- Probably not played enough, not strong enough, or maybe it hasn’t been discovered yet and will hopefully be added next week.
- It’s also impossible to fit every single variation of every composition on a tier list, so expect variations of these comps to do well too.
- I also add in different versions of different comps in the notes, so be sure to read through them! (For example, one synergy might have two different playstyles such as reroll or standard)
- [Legendary Unit] carry is the best in the game, where is it?
- It is not reliable to have a 5 cost carry as a composition because you will not be able to get a 2* Legendary consistently. There may be metas where there are ‘Fast 9’ comps, but these often use any legendary they can get instead of a specific one.
- What does Difficulty, Item Dependency, and Variance mean?
- Difficulty is how hard the composition is to play. Difficulty does not factor into the strength or viability of the composition but serves as a factor for new players.
- Item dependency is how important specific items are to the composition.
- Variance is the approximate placement range of the composition. For example, a consistent Top 4 composition has Low variance. A composition that either places 1st or 8th has a High variance.
- Does what composition I play matter?
- No. Playing TFT well matters a lot more
- I can’t get these exact items every game
- You don’t need perfect items or exact items unless specified in the Requirements section. Most of the time you just need ‘playable’ items and not ‘best in slot’ (BIS)
- You are wrong, XYZ comp should be in S tier and ABC player said this S tier comp sucks
- Everyone has different opinions. I try to take a data based approach by analyzing games from the best players in each region to combine all their opinions.
- At the end of the day, comp doesn’t matter much compared to just playing TFT well (rolling, managing econ, positioning, etc). If you check out the best players, you will see that each player favors different compositions yet they are all very highly ranked.
- When is this site updated?
- Every Friday
- Where can I learn more?
- There are many resources and players to learn from. I suggest starting at my YouTube channel and this website.
Knowing how to get better at TFT is much more important than knowing what compositions to play. Knowing how to play Teamfight Tactics will help you no matter what patch it is.
Tier placement assumes strong play. Refer to Difficulty metric before attempting to play.